Overview of the manual
The next chapter, "Getting started", provides a hands-on guide to basic configuration of the platform and the devices. It covers both the workflow setup and security management. Most of the tools and functionalities are described briefly here, and more details can be found in the following chapter "Components", which contains a description of every module of the Platform. For even more details and specifications, refer to the technical documentation.
Introduction
Comarch IoT Platform is a dedicated cloud application for all our IoT devices. With IoT Platform tailored to your needs, viewing the information collected by the devices is a breeze. We propose a solution which is:
-
intuitive – because navigating through the interface should never be frustrating, or consume too much of your time;
-
scalable – the database and its possibilities are ready to grow along with your business;
-
secure – all the data is encrypted, and the user access management is highly customizable;
-
reputable – many companies successfully use the Platform along with our IoT devices.
IoT Platform can be best described as a three-part system:
-
On the device side, there’s an interface which allows the devices to automatically send the data in real time, using a protocol such as MQTT or LwM2M (deprecated);
-
At the core lies a cloud-stored database, in which the device data is saved;
-
The app external interface provides easy access to the data – both through a REST or Websocket API (for vertical applications) and through a website (for humans).
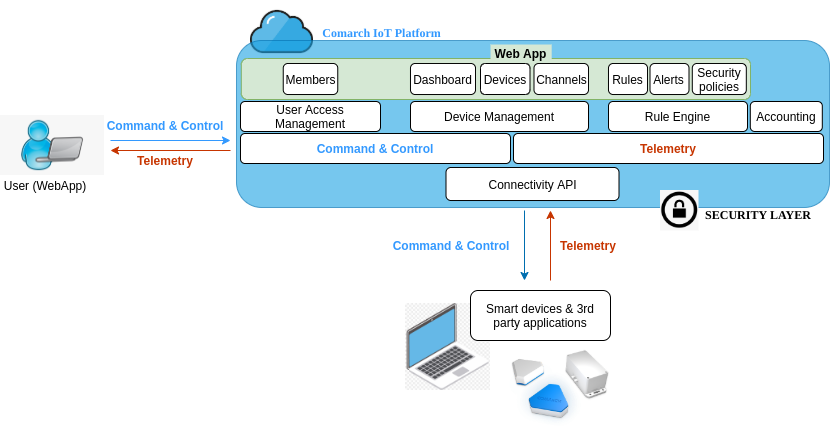
The architecture of Comarch IoT Platform – Smart Metering and Asset tracking are examples of our vertical applications.
To summarize – the IoT Platform most important functionalities include management of the IoT devices, telemetry, and an interface suitable both for users and for other applications.
Getting Started
Account creation
An individual account should be created for every person working on a project. Accounts are highly customizable in terms of access rights, and provide personalized dashboards for every person involved.
A project is a container for all devices working together. Their state and indications can be viewed within a project. Projects are isolated from each other.
At this point, either you have been granted an administrator account, or you have been assigned an administrator from Comarch to begin the setup for you. Feel free to contact us if you’re not sure which is the case. If the account has been pre-created for you, you can skip the next section and proceed to Connecting your first device.
Creating new accounts for users
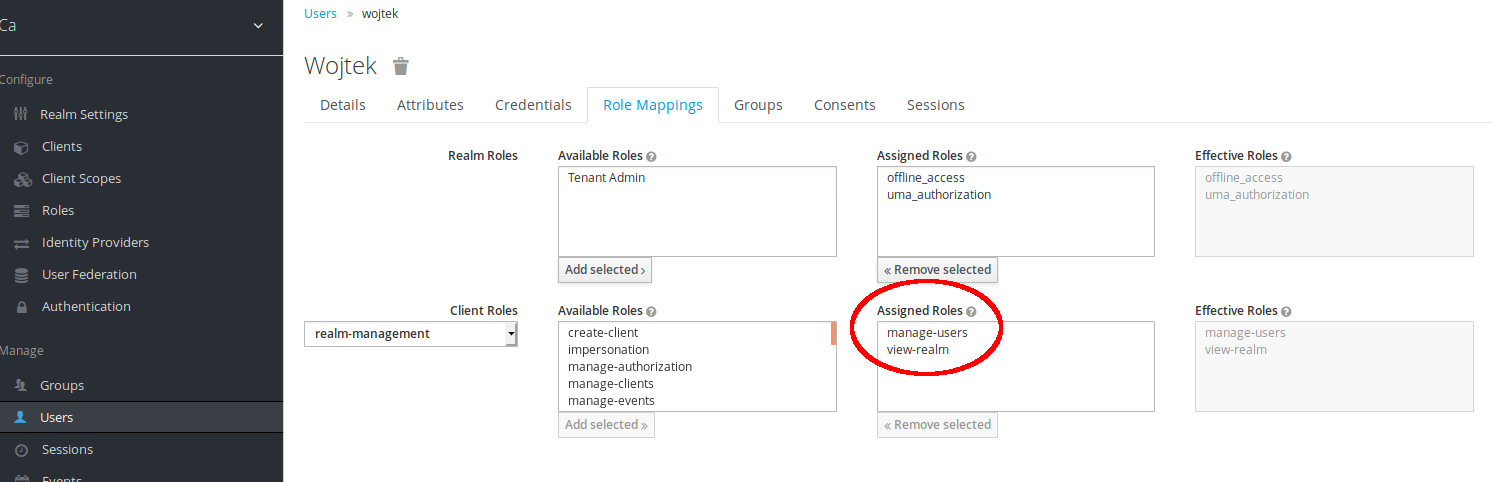
Creating new user accounts is essential before you can add them to the project. If you have an administrator account, you can create new user accounts for your clients or coworkers. Visit https://{host}/auth/admin/master/console/host
-
Provide permissions. Proceed to section "Users" in the menu on the left, and provide the tenant administrator manage-users and view-realm permissions, as shown below:
-
Add new users. Log in as the tenant administrator and proceed to users management console at
https://sso.{host}/auth/admin/{tenant}/console/#/realms/{tenant}/users
-
As the user, check your email. An email with a temporary password will have been sent to the user. After logging in, the user will be prompted to change their password, and then redirected to the IoT Platform.
Creating new project
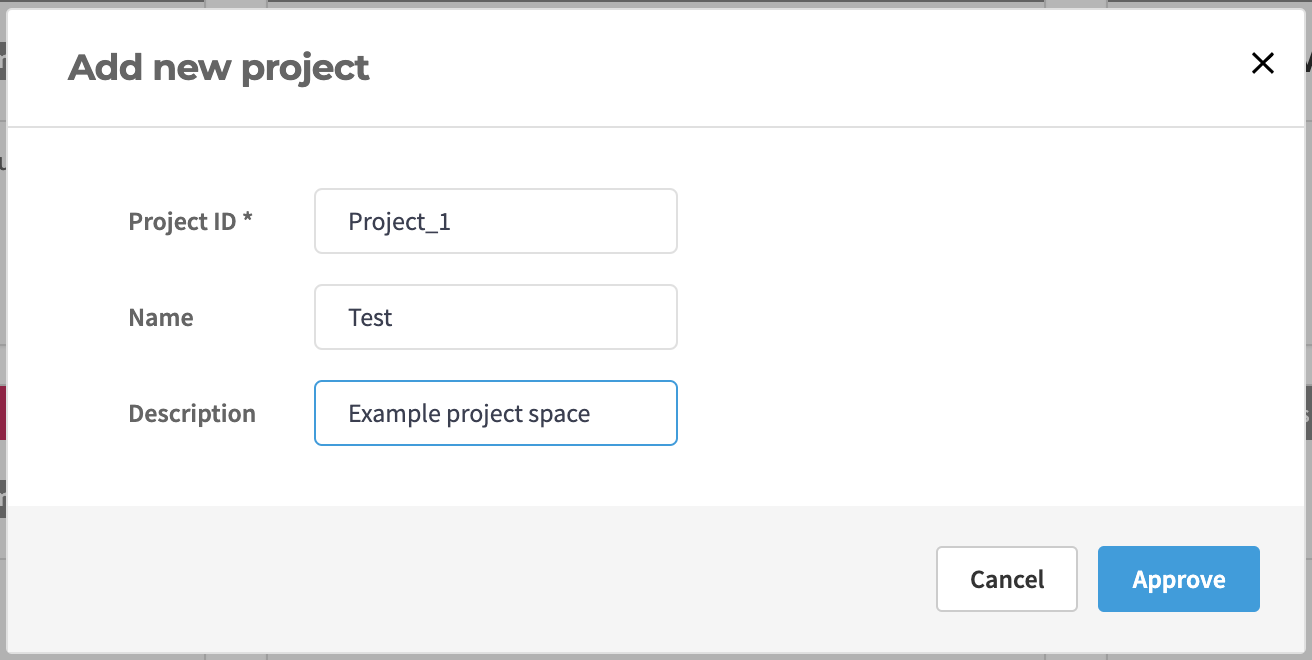
Visit the project site and log in with your credentials. You’ll be redirected to the projects directory. Click "Add new project" to create a new one. You should see the following window:
-
Project ID should be unique, but it’s not an issue at the moment as you are creating your first project. It’s best to choose something both short and descriptive, like the name of your service, or a key word that everyone will understand. Most important things to keep in mind are that it cannot be changed later and is case-sensitive.
-
Name does not have to be unique, and can be changed later. Think of it as something less binding and more arbitrary.
-
Description can (and probably should) be longer than the name, and should provide a brief summary of what the project is about.
After you click "approve", the project will be seen in the dashboard as follows:
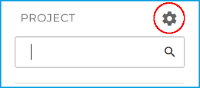
Click on the project tile to select it. The project’s properties (name and description) can be modified by clicking the cogwheel icon:
Connecting your first device
To connect your first device, go to section "devices" and click "Add new device(s)". You should see a "Select device source" screen. You can either define device by yourself or define few devices. For your first device, it’s recommended to choose the first option. Click "next".
Option 1: Defining device by yourself (wizard)
|
Important
|
Only SenML with JSON is supported out of the box. For custom JSON messages please refer to [Adapters] |
You should see an "Add device screen". Here you can provide basic information about the device.
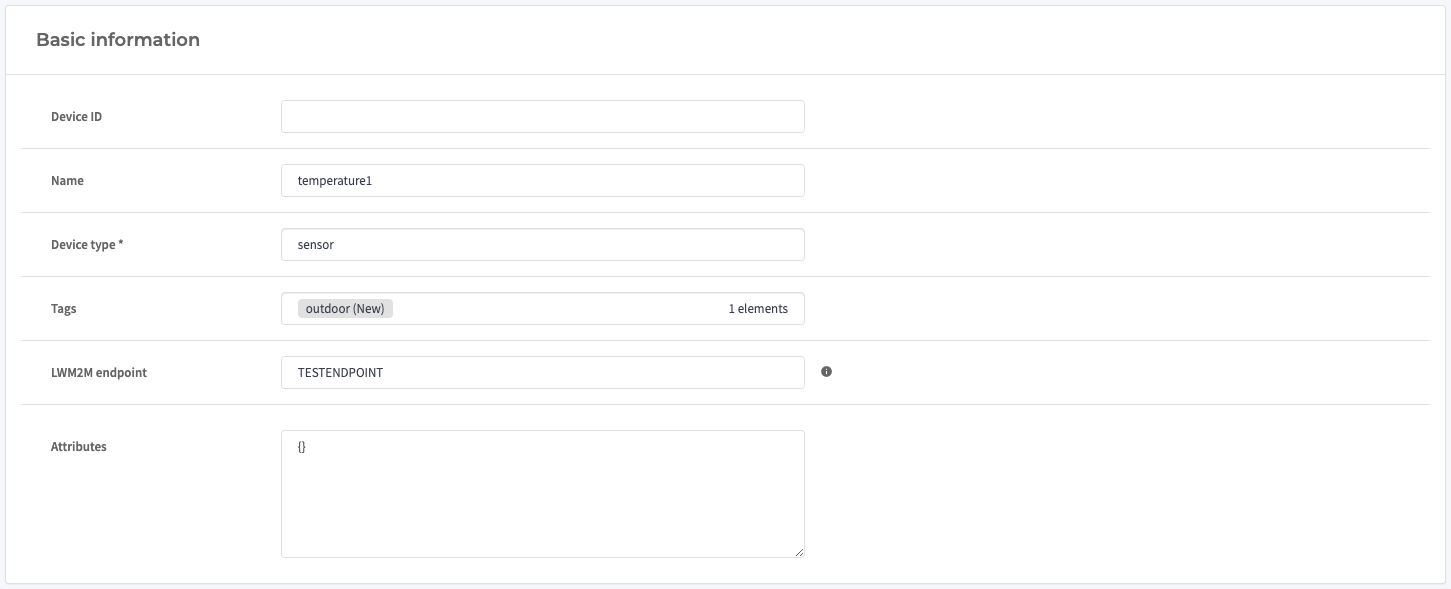
Device ID: unique indentifier of the device. It will be needed when you decide to assign rules or a channel to this device. If this section remains empty, the system will generate a random ID for you. The device ID cannot be changed later
Name: it helps you recognize devices easily. It does not have to be unique and can be changed later.
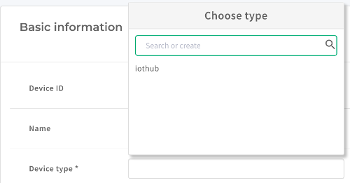
Device type: it depends on the type of device you are connecting. Click on the input window to see an expandable list, and choose the correct device type:
Tags: tags allow grouping devices according to your needs. After assigning a tag to a device, it’s possible to search for them easily by the tag, which is especially helpful if the project contains a lot of devices. One device can have multiple tags assigned.
Attributes: values not define directly on model, like geolocation. Attributes are added in JSON format.
The second step is adding properties to the device.
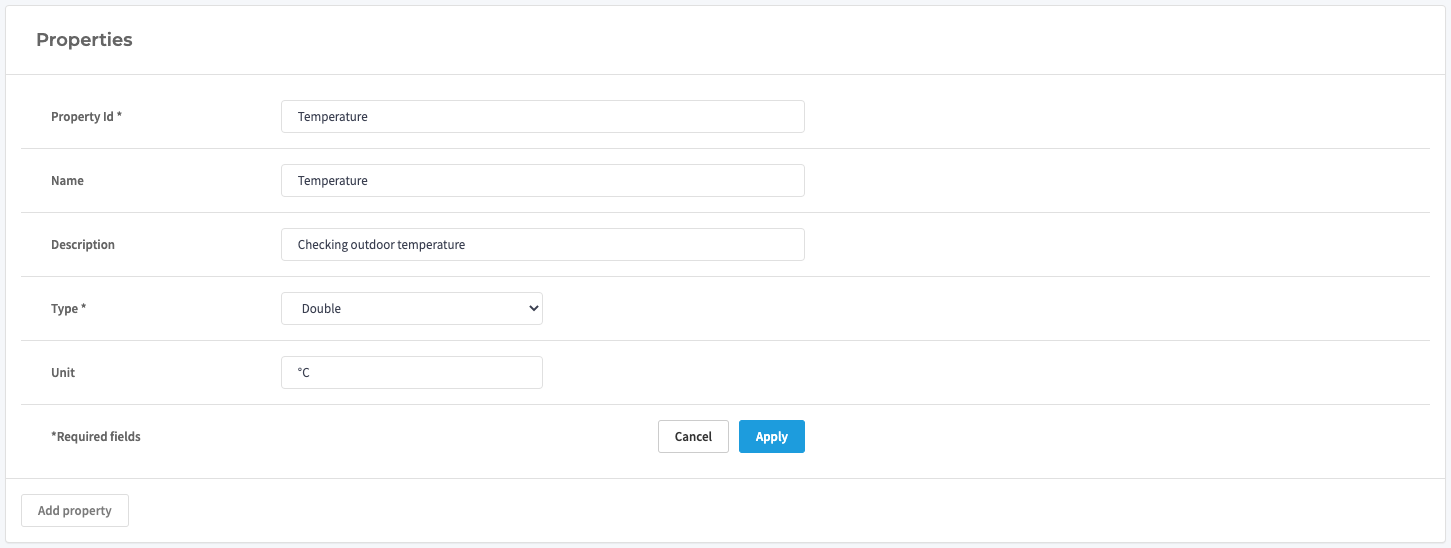
Depending on the device, it could be battery level, temperature, and more – for full list of properties available for your device, refer to its documentation. One device can, of course, have many properties. Here, you can add the following information:
Property Id: unique name (address) of property of device. While creating the first property, you can for example type "online".
Name: it does not have to be unique, rather descriptive. It can be the same as ID, for example the name "online" or "temperature" are perfectly valid – they’re both short and self-descriptive.
Description: description of device property , expressed as string (text value), double (numeric value), boolean (true/false), or data (other, specific data). For property "online", "boolean" is the correct type.
Unit: unit of the property, e.g. % or dB. You can also leave this field blank, for example for a property like "online".
The third step, channels, defines ways of connecting with the IoT Platform. IoT Platform supports connection via MQTT and LwM2M (deprecated) protocols. In this step, you can configure connection addresses, topics, credentials, etc.
|
Warning
|
Setting up a channel is necessary for the device to communicate with the Platform. |
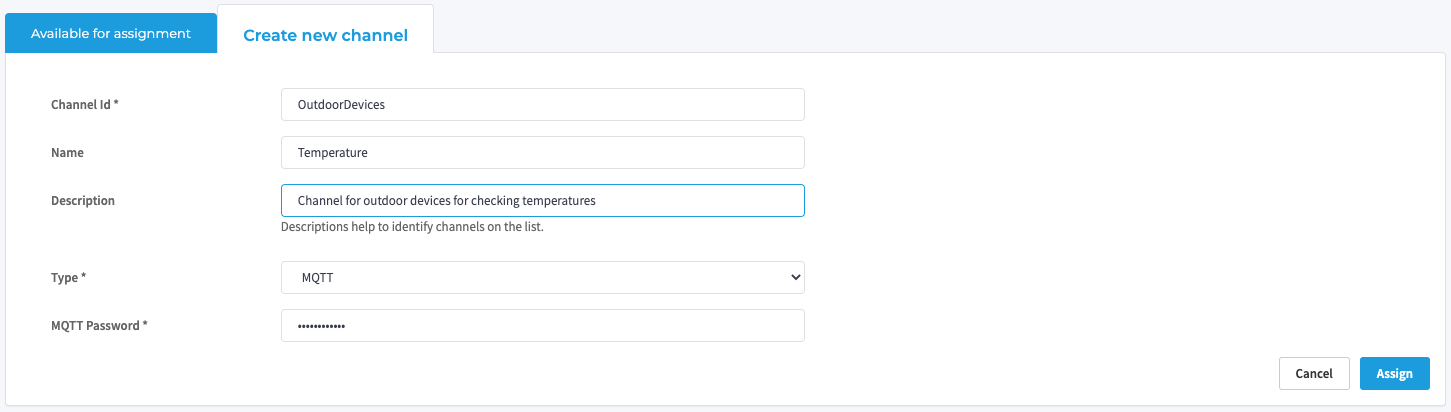
The section "Available for assignment" contains created channels available to assign to a device. Most probably, there are no channels at this point and it is necessary to create one. To do so, select section "Create new channel".
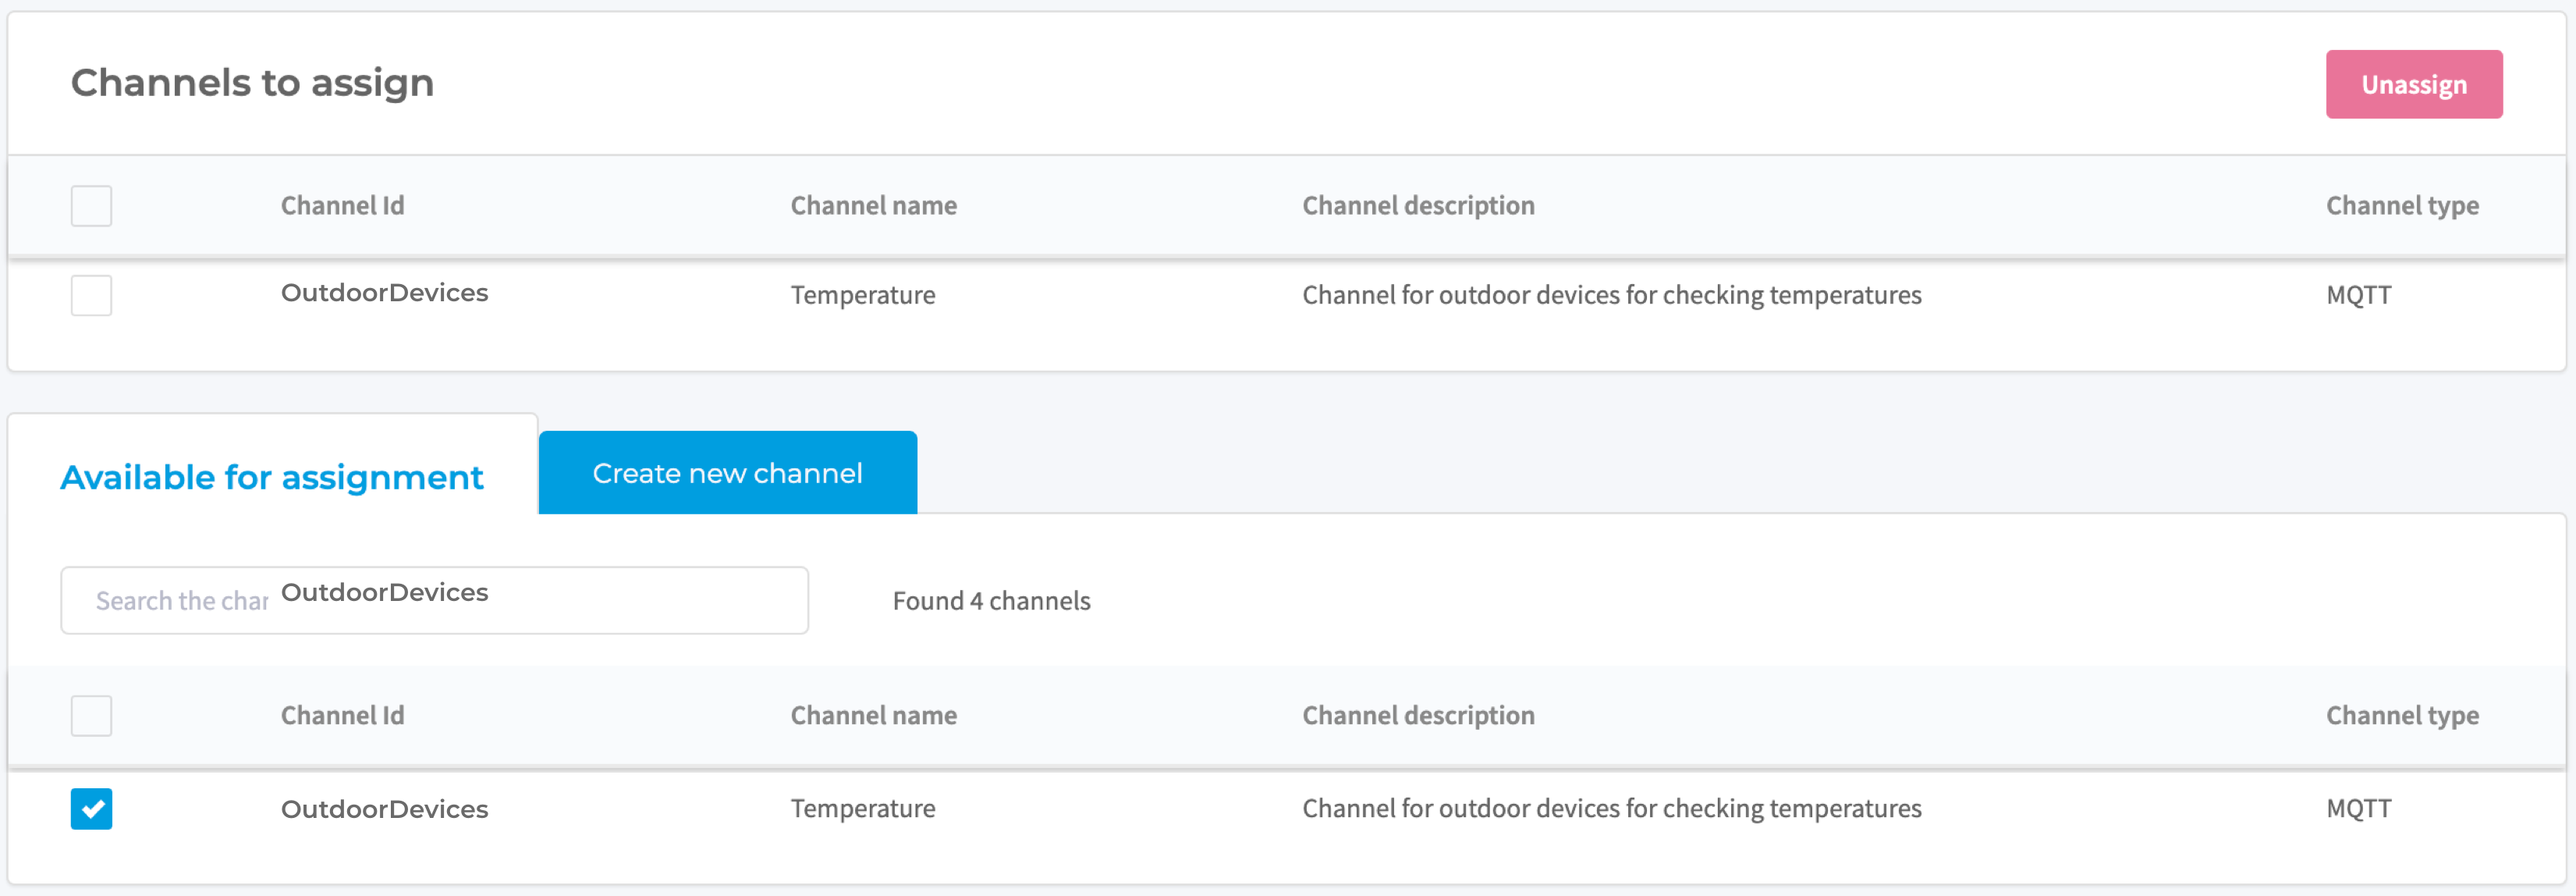
-
Channel ID: unique identificator of the channel, like "outdoor-channel-3" or "d3th-3i54-12h4-294b".
-
Name: more descriptive, and not necessarily unique, name of the channel.
-
Description: a brief yet comprehensive description of the channel.
-
Type: refers to the type of the protocol – either MQTT or LwM2M (deprecated).
-
Device ID: list of available devices. Select the preferred device’s ID from the expandable list.
-
MQTT Password: channel password of your choice. After entering the password, write it down in a safe place.
|
Tip
|
To change the password in the future, select tab "channels", find the channel you’d like to change password to, and click the three dots next to channel type. Select "edit", click the "I want to type new MQTT password" checkbox, and enter the password of your choice. |
Option 2: Define few devices (JSON)
It is also possible to add multiple devices using JSON-formatted text.
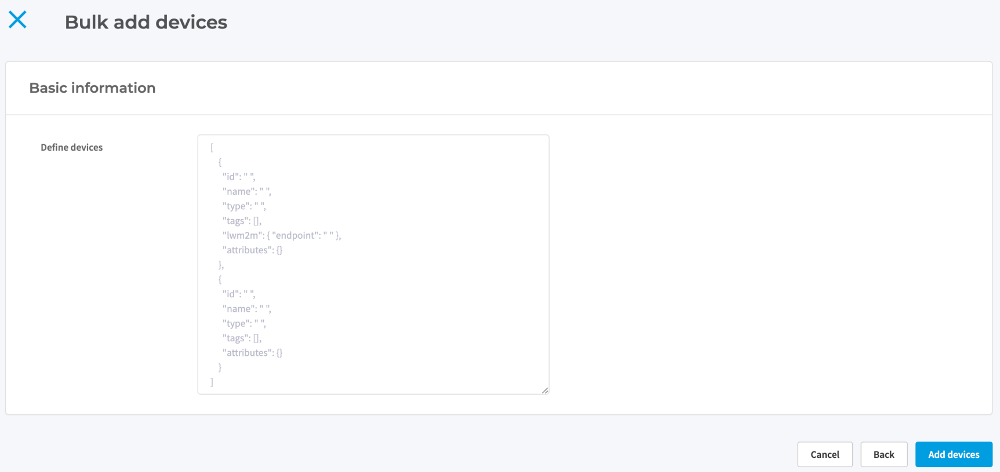
In the prompt text, you can see a sample formula for adding multiple devices. This view contains a built-in JSON validator, so a message will be shown if you miss any coma or a bracket. To finish, click "Add devices".
Creating a rule – introduction to rule engine
The rule engine allows you to set up a notification system in cases when you’d like to be informed about particular events, e.g. the device going offline or exceeding the limit of messages sent per hour. You don’t have to create any rule for the device setup to work, so you can skip this step now. Detailed instruction to creating rules is covered in section Rule Engine.
Introduction to dashboards
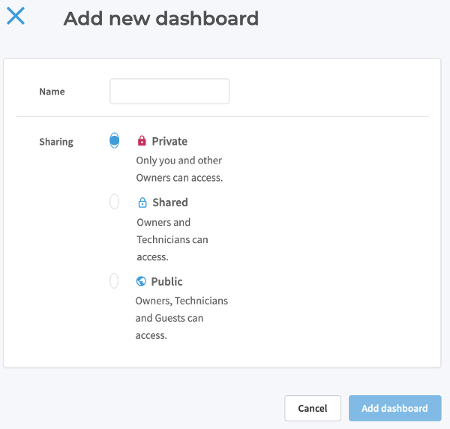
To see the values of device properties, it is necessary to create a dashboard. When you first select "Dashboards", you should see a message saying "There is no dashboard available in this project". To create the first dashboard in the project, click "Add new dashboard". One project can have multiple dashboards. When creating a dashboard, you can give other users limited access to the content on the dashboard.
-
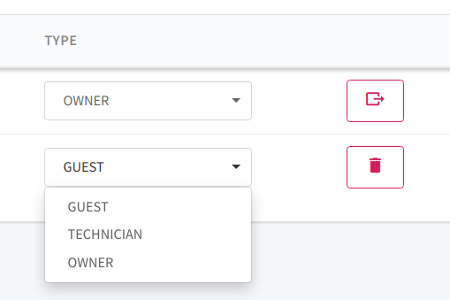
Guest: read-only. Guest can’t create and modify anything on projects.
-
Technician: read-write. Technician can read, create and edit the content on projects.
-
Owner: read, write and managing – beyond the technician functions, the owner can manage users in the project.
After clicking "Add dashboard", you should see a notification confirming successful creating of the dashboard. You can edit its properties and privacy settings (access rights) by clicking the cogwheel icon and choosing "edit dashboard". You can also toggle autorefresh, and set its time interval. Now, you can add widgets to your dashboard.
Widgets
A widget is a tile on the dashboard that displays the device property of your choice. When added to the dashboard, they will look like this:
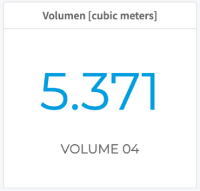
A single value widget.
Or, in case of table and graph widgets, like this:
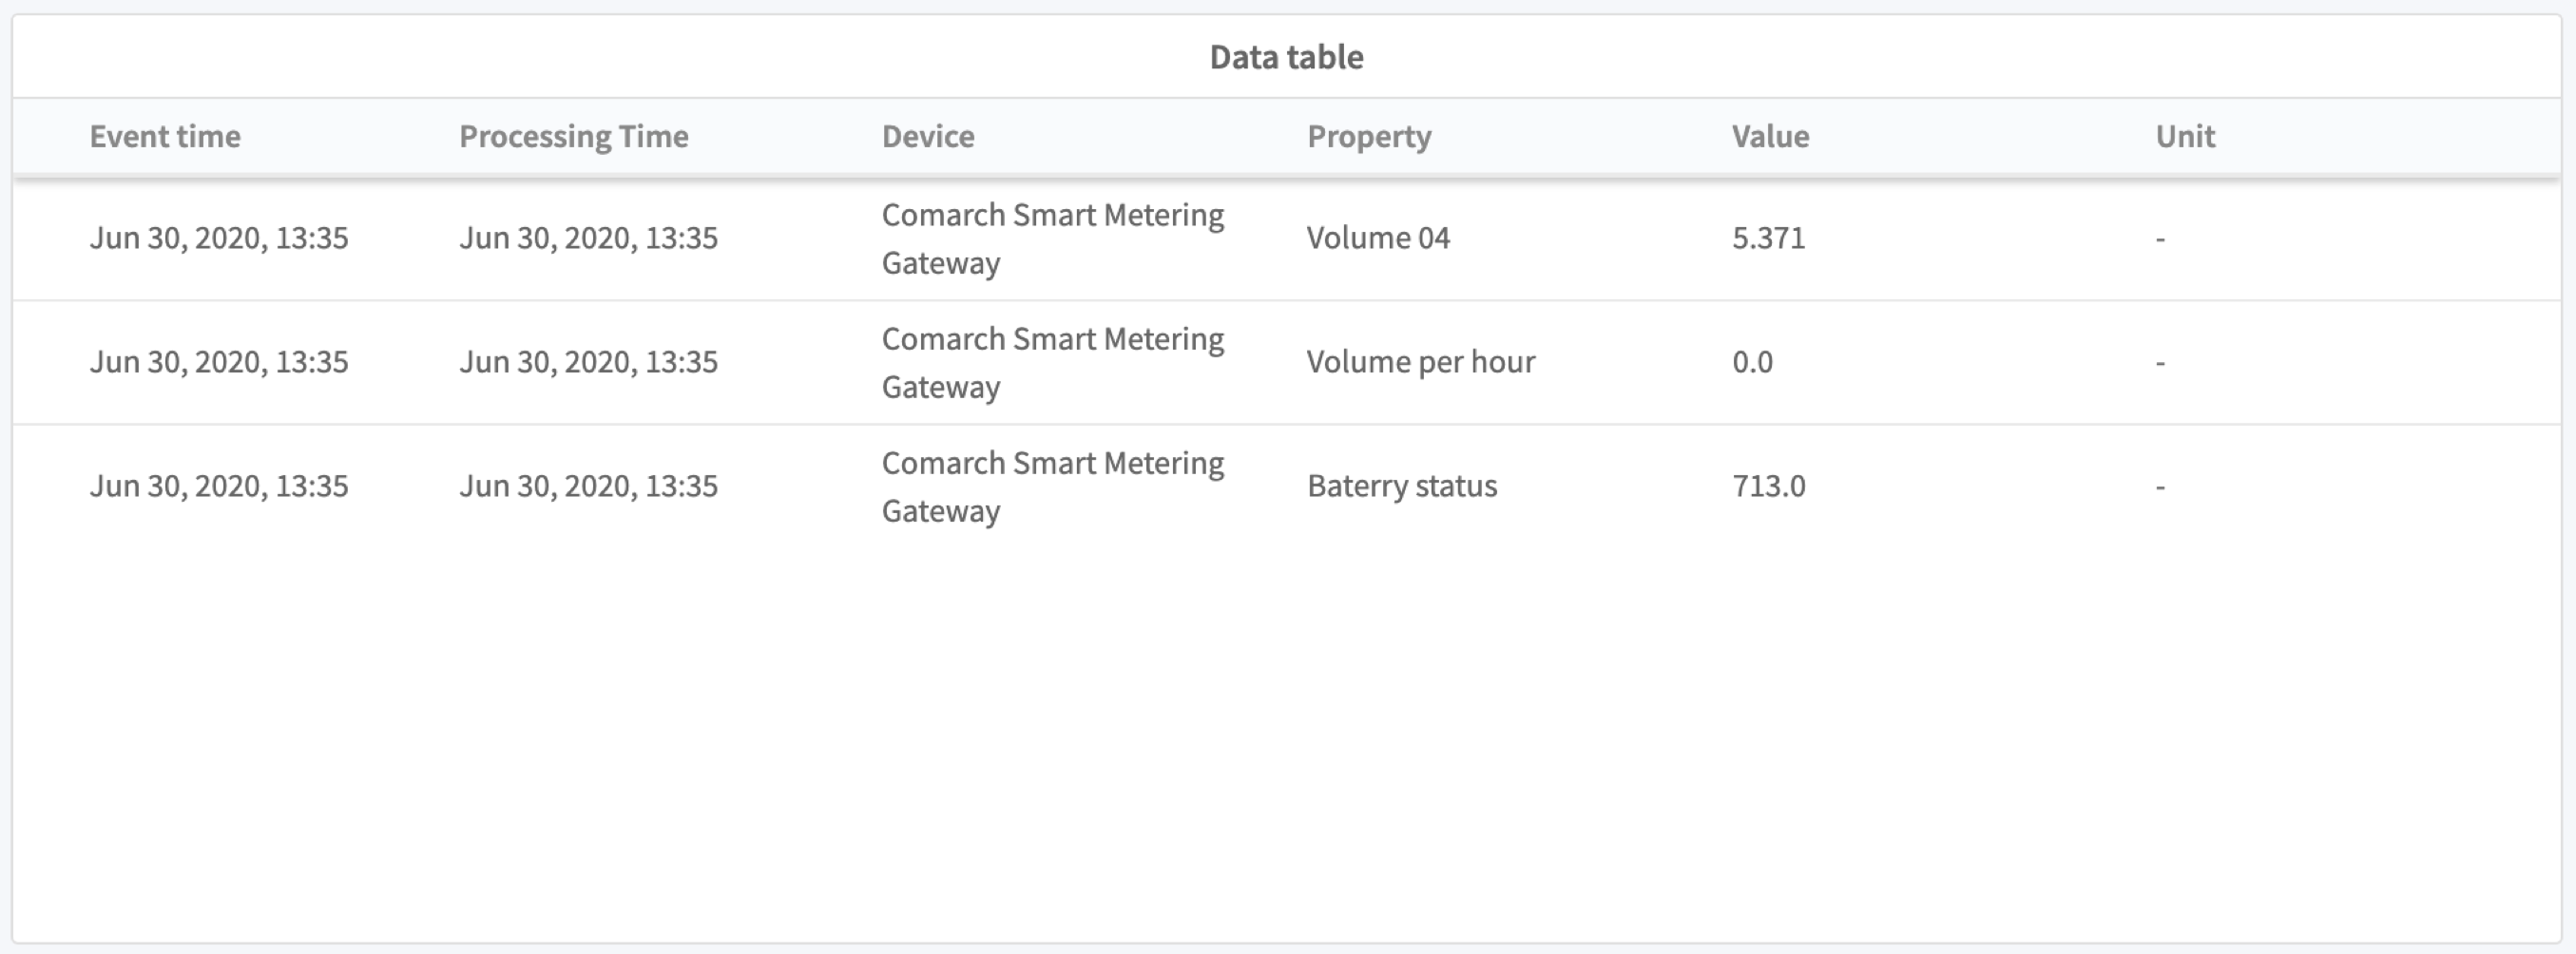
A table widget with three properties.

A graph widget, perfect to visualise values that change in time.
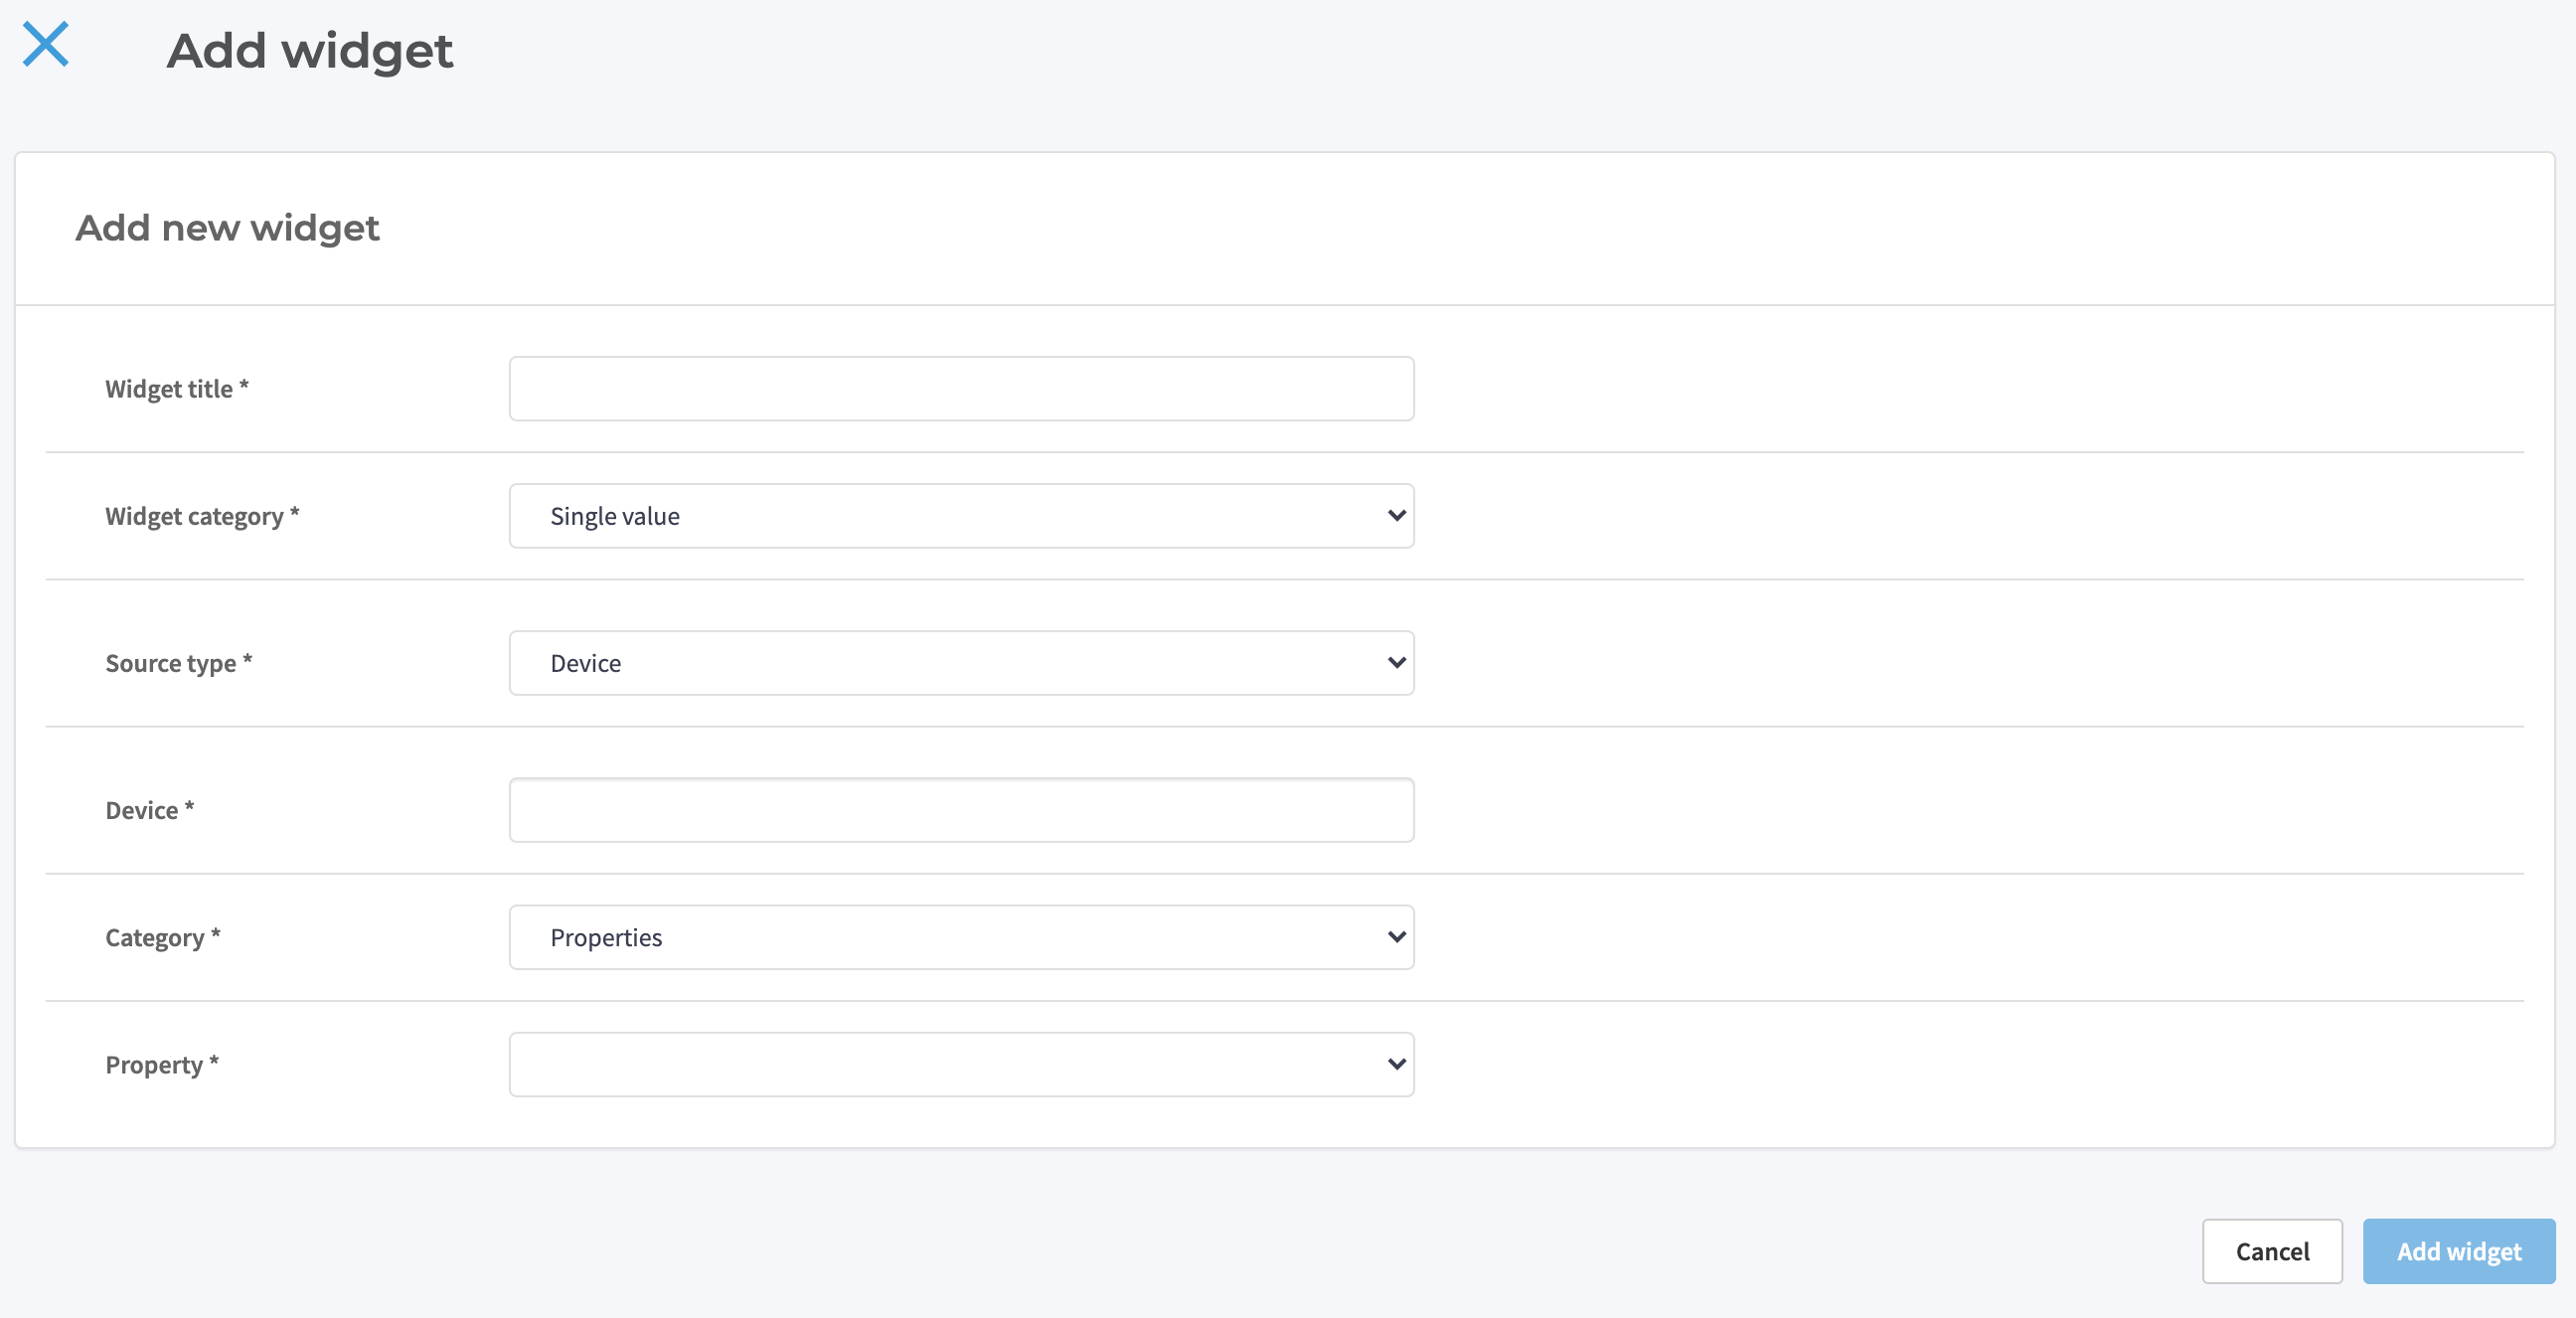
Adding new widget
To add a widget, click the "Add new widget" button. You should see the following screen:
-
Widget title is what will be shown on the dashboard, at the top of the tile.
-
Widget category can be either single value, graph, or table, as pictured above;
-
Device – the device which property you’d like to show, as indicated by its ID
-
Category: Properties (this should be the only possible option in this case)
-
Property: select the property of your choice from the expandable list.
Adding collaborators and securing your device
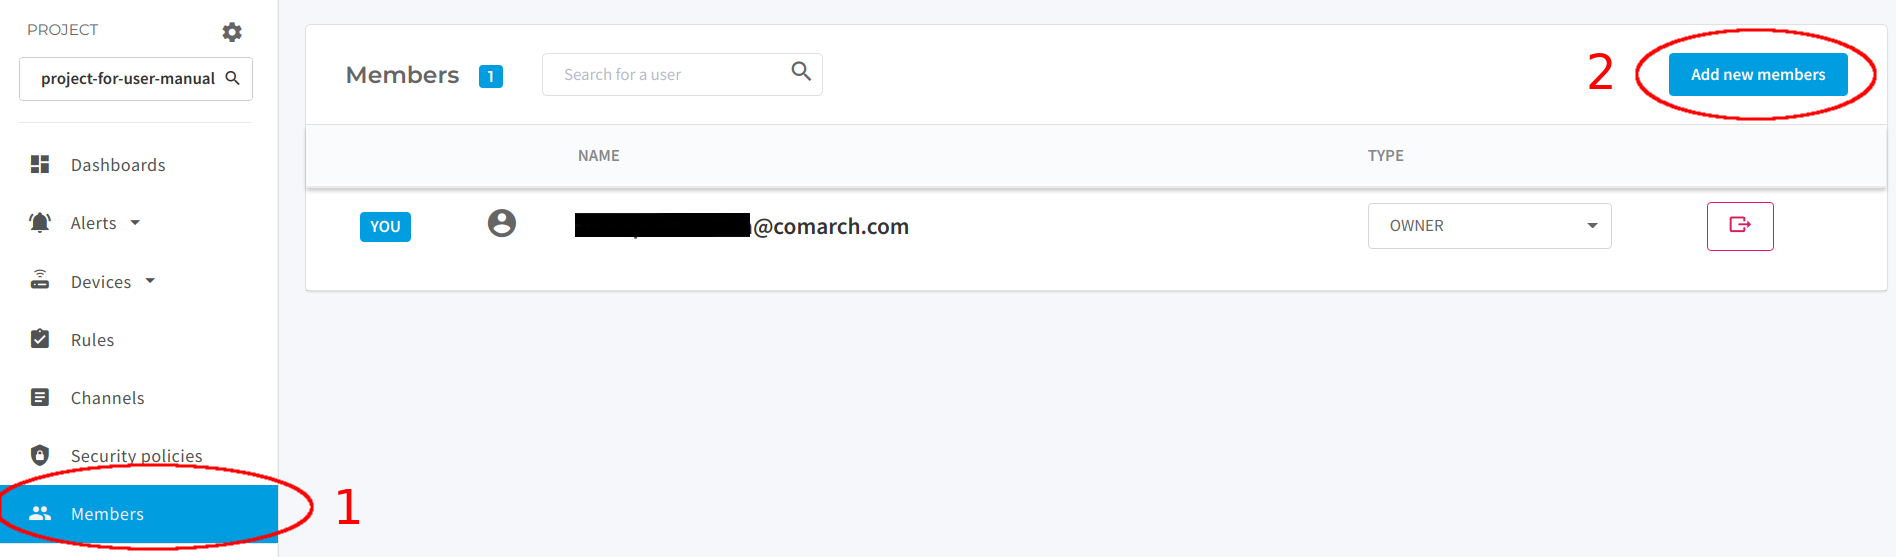
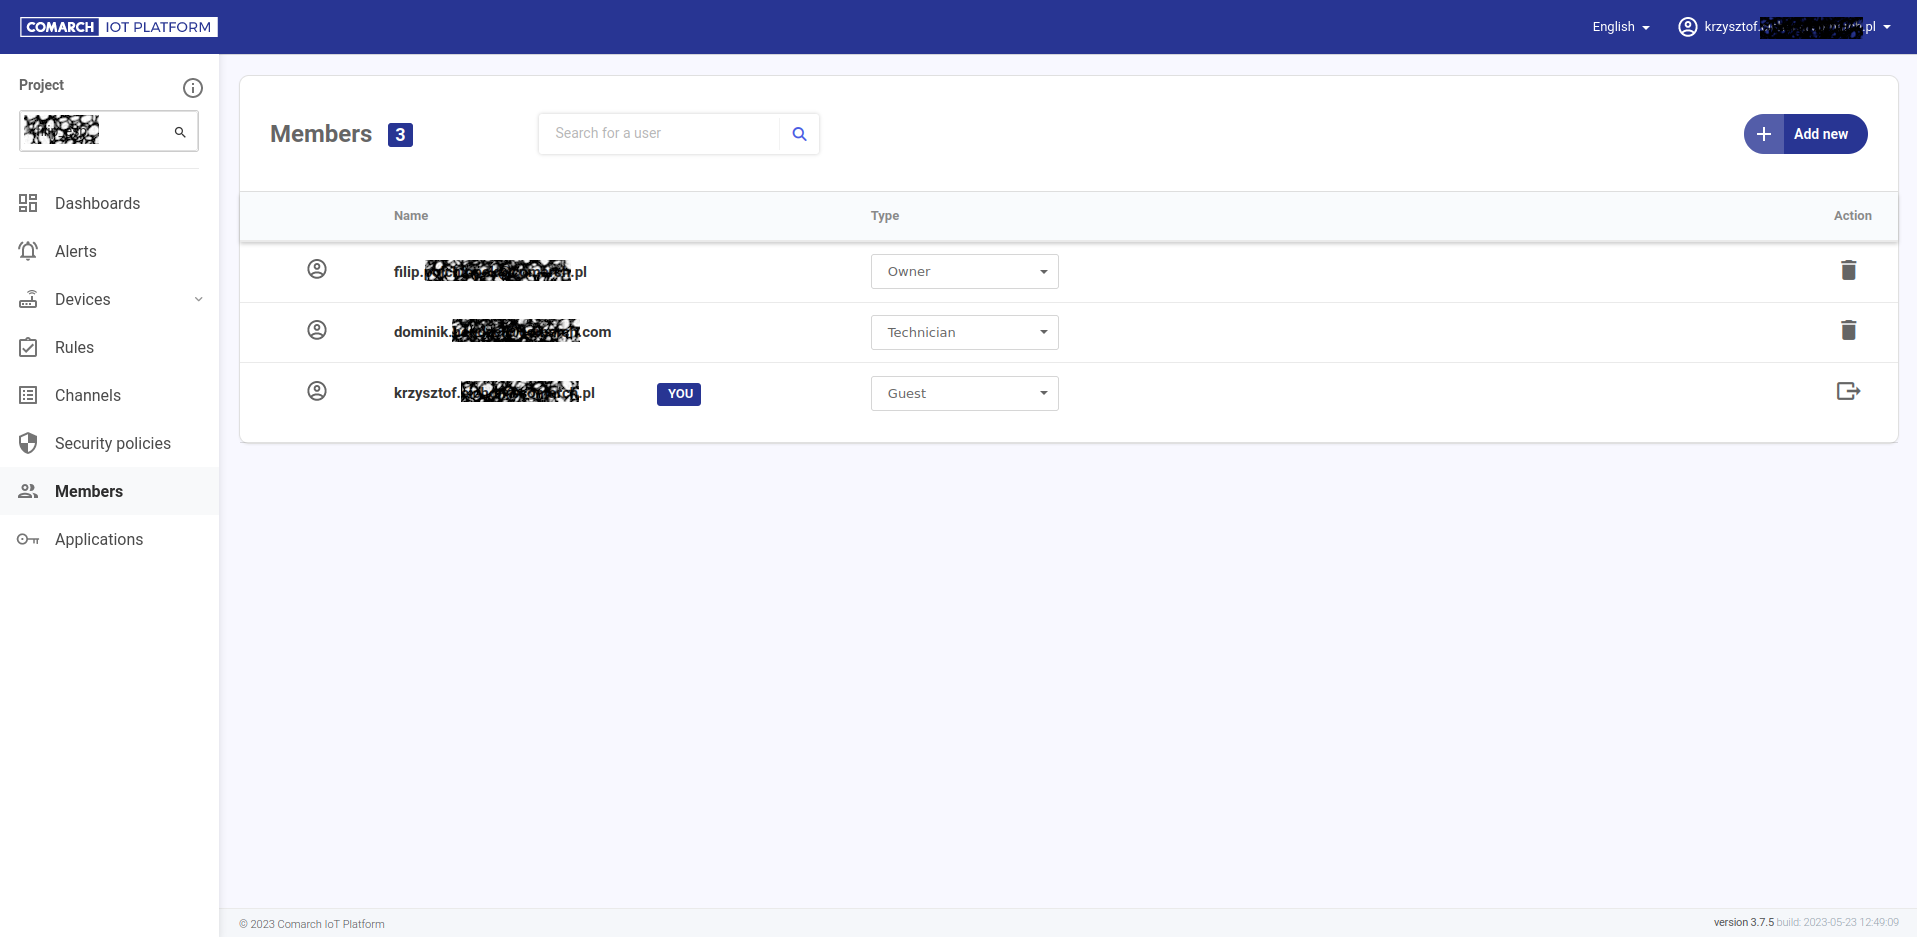
To ensure restricted access to the project, remember to give permissions only to your authorized coworkers. To add more people to the project, select "Members" and click "Add new members":
|
Warning
|
Make sure the users you want to add already have an account. If you have been granted an administrator account, make sure you have followed the instructions in Creating new accounts for users. |
You should see a window prompting you to add a new members to the project. To add a collaborator, type their email address and click "Add". By default, the new member will be added as a guest, but their role can be changed afterwards. To change the role, choose another from the expandable list:
Detailed information about scopes of particular roles are covered in section [Managing roles].
After completing all above steps, your project should be all set up and working. The next chapter provides more detailed information about each of the Platform’s components.
Components
This section provides more detailed description of each of the Platform’s components and their functionalities not mentioned in Getting Started section.
Device Management
List of devices and editing properties
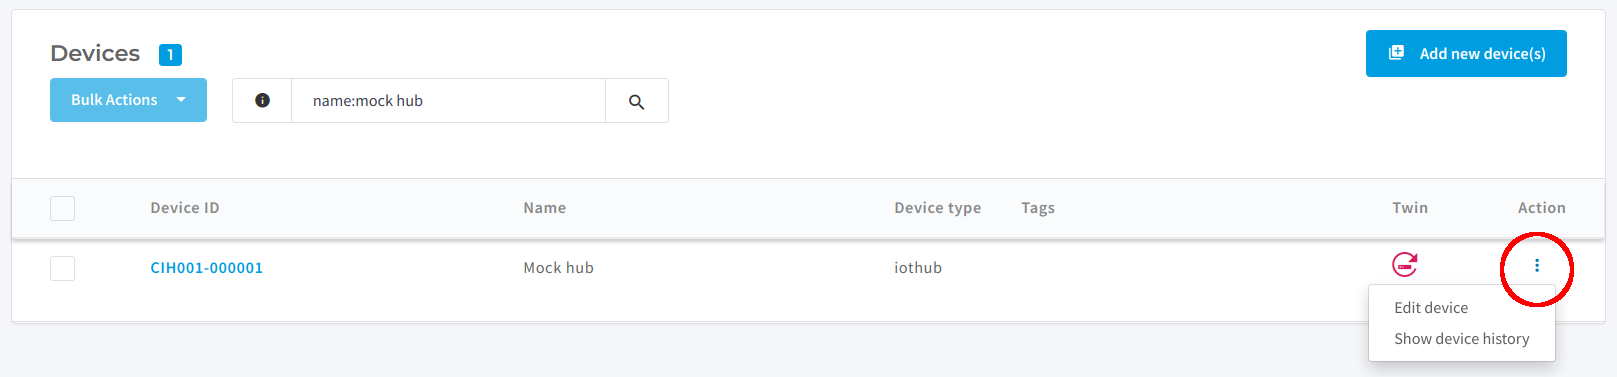
Go to section "Devices" to see the full list of the devices in your project. To edit the device, click Action… and Edit device:
Here, among adding other attributes, you can apply geolocation tag to the device. Click on the map (or enter a JSON-formatted text, if you wish) to generate property "geolocation".
|
Warning
|
"Geolocation tag" is not a tag as used in "device tags". The resemblance is coincidental. |
While editing properties, you’ll approach the name device twin. A device twin is not a physical device, but a JSON document. For the time being, you can leave the field "desired propierties" blank. We’ll talk more about device twins in section Connectivity.
Filtering devices
It’s possible to filter the devices in the project using the filter field:
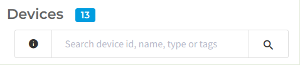
You can filter the devices by ID, name, device type, or tags. To filter, you need to use query syntax, for example: name:mydevice
|
Tip
|
If your device’s name contains spaces (for example "Temperature sensor", do not put in in quotations. Simply write |
|
Tip
|
The filter input is not case sensitive, meaning that you can filter by |
Connectivity
IoT Communication Patterns
-
Telemetry
-
Command & Control
Telemetry – what the device tells the IoT Platform
After the device changes its state, it sends its values to the Platform so you can see them in device history and visualize them on widgets. The history of all devices connected to the Platform are safely stored in Comarch Data Centers located around the world.
SenML over MQTT
Device can send its telemetry to IoT Platforms MQTT broker. MQTT is a popular publish/subscribe messaging protocol. To connect with MQTT broker, device must be assigned to a channel and use proper credentials (defined in its channel).
Format of telemetry messages is known as SenML (Sensor Measurements List) and is defined in RFC-8428. Current version of platforms telemetry supports JSON messages only. IoT Platform imposes that name (after resolution) of SenML record should follow urn:dev:ca:{tenant}:{project}:{property} pattern.
How to connect a device see Connecting your first device chapter.
Example message:
[
  { "n": "urn:dev:ca:ca:project:hub:movement_sensor", "t": 1.276020076e+09, "vb": true},
  { "n": "urn:dev:ca:ca:project:hub:battery_level", "u": "per", "t": 1.276020091e+09, "v":23.6}
]
Telemetry frame size is limited to 128kB. Frames that exceed this limit are discarded. It can also contain maximum of 128 records.
Telemetry over HTTP
Address: https://{TENANT}.{DOMAIN}/telemetry/{FORMAT}/projects/{PROJECT}/channels/{CHANNEL}
Method: POST
Payload: JSON message body (Requires header Content-Type: application/json)
Authorization: HTTP BasicAuth where:
-
username is MQTT channel username in format:
{TENANT}.{PROJECT}.{CHANNEL} -
password is MQTT channel password
This HTTP endpoint requires user to specify FORMAT, which support adapters. To use standard telemetry format, user have to specify value senml_json.
Adapters are more thoughtfully described in [Adapters]
Command & Control – what you tell the device
When you change a setting on a device – for example, you add new property "online" or change the geolocation tag – you don’t connect directly to the device; rather, you change the contents of a device twin – a JSON document associated with your device. The changes in device twin are submitted to an MQTT topic which the physical device subscribes, meaning that it watches constantly for any changes and will update its state accordingly.
The main advantage of such solution is that the physical devices don’t have to be constantly connected to the Platform. If any of them goes offline, you can still operate on it on the Platform or change its properties. When the physical device goes back online, it will update its state according to the changes you made.
Use Cases for IoT Commands
By design, Commands are to be used for requesting a specific action to perform on target device. Such action doesn’t have to be fully integrated with IoT Platform, but can use some other services.
This interaction works best for complicated tasks, which are hard to represent in a set of device properties.
Examples:
-
diagnostics logs upload (provide repository where to upload these),
-
firmware update (provide repository with images to download),
-
restart the device,
-
etc.
Use Cases for IoT Device Twin
By design, Device Twin is to be used for establishing given state on target device. Such state is defined by two JSON documents, one representing device physical state and one representing logical state, requested by the user. Device updates its physical state to match requested logical state.
This interaction works best for tasks, which can be represented as a single property change on target device.
Examples:
-
turning on the camera (set "camera": true in desired JSON document and wait for device to respond to it in reported JSON document),
-
lowering the temperature (set "temperature": 12.3 in desired JSON document and wait for device to respond to it in reported JSON document),
-
etc.
IoT Commands
This solution consists of several MQTT topics and bi-directional communication between devices and the cloud service. It’s similar to typical request-response model.
Glossary
| Term | Summary |
|---|---|
Command execution |
A command process, which corresponds to a single device within execution targets |
Terminal command execution status |
An execution status, which is one of the final stages of command execution. Corresponds to |
Non-terminal command execution status |
An execution status, which is a transitive stage of command execution. Corresponds to |
Execution queue |
A list that contains command execution in order to execute |
Commands Management REST API
Human interaction with commands management is performed via REST API available by open API.
MQTT Topics
| Topic name | Permissions | Description |
|---|---|---|
|
|
Device queries IoT Platform for command to execute and updates command execution status |
|
|
Device receives answers from IoT Platform for issued requests |
|
|
Device receives notification about command events (notably cancellation and timeout events) |
|
|
Device receives notification about new command to execute |
Device flow summary
-
After connecting, device subscribes to the
{…}/notify-next topic. Note, that it will not receive command executions that were added while being disconnected. It delivers only new commands for execution. -
Device publishes ExecutionQuery request to
{…}/requesttopic to retrieve the next command execution to process.-
Because the ID might be unknown at the moment, retrieving next command execution can be done with a special $next symbol.
-
-
Device publishes ExecutionUpdateEnvelope request to
{…}/requesttopic, moving the command execution toIN_PROGRESSstate and begins processing.-
If timeout was configured for given command execution, it would start at the moment of processing start.
-
If device had crushed while command execution, sending ExecutionQuery to
{…}/$next/requesttopic returns currentIN_PROGRESScommand.
-
-
When execution is finished, ExecutionUpdateEnvelope request to
{…}/requesttopic, moving it intoSUCCEEDEDstatus.-
When execution had ultimately failed, the command execution should be moved do
FAILUREstatus.
-
-
Move back to point 2, until no next command execution is available.
-
When no command executions are queued at the moment, creation of the new one will be published on
{…}/notify-nexttopic.
-
|
Note
|
Additionally device needs to subscribe to {…}/notify topic to observe potential state changes to CANCELLED or TIMED_OUT states. Device may subscribe with "+" wildcard instead of concrete command id in topics. If command execution is in one of termination states the further state change is forbidden. Response for ExecutionQuery request with $next alias as command id contains error with COMMAND_NOT_FOUND code if execution queue is empty.
|
Commands execution order
Each device specified within the command targets list corresponds to a single execution process. Therefore each command execution is uniquely identifiable by pair commandId and deviceId. Each device can have no more than one command execution in IN_PROGRESS state.
The execution queue is a list that contains command executions with non-terminal states (either one of QUEUED or IN_PROGRESS). Command execution in IN_PROGRESS state is always on top of the execution queue. The other command executions in QUEUED state are ordered by creation time.
Device requesting Commands to Device ExecutionQuery with $next command id in topic gets the first (if any) element from execution queue. Such element may be currently being executed IN_PROGRESS command or next QUEUED command to start.
Device is allowed to interact only with the first command execution in execution queue (e.g. to change the state). Once command execution state is changed to one of terminal states, the command execution is removed from execution queue.
Limitation
There are following limitation for commands:
-
message send to
{…}/requesttopic must not exceed 64 KB. -
number of messages send to
{…}/requesttopic and related with one command must not be larger than 40. -
number of entries in statusDetails map in CommandExecution and CommandExecutionState documents must not be larger than 10.
-
size of key in statusDetails map in CommandExecution and CommandExecutionState documents must not be larger than 128 characters.
-
keys in statusDetails can contains only letters, digits or hyphen.
-
size of value in statusDetails map in CommandExecution and CommandExecutionState documents must not be larger than 2048 characters.
-
size of correlationId in any request must not be larger than 36 characters.
|
Note
|
Messages that exceeds limitation may be ignored by IoT Platform. |
Device-Twin control
In order to control devices, device-twin API must be used. It is accessible at:
Data Model
Fields desired and reported are representation of device state in [SenML](https://tools.ietf.org/html/rfc8428) format.
For fields specified in SenML as doubles [JSON and XML representation](https://tools.ietf.org/html/rfc8428#section-7) values are stored as 128bit decimals to support more precise sensors.
PUT
Put request creates new device twin or replaces existing one, reported should be an empty array.
Example:
curl -XPUT  https://<tenant>.<host>/api/projects/<project>/device-twins/<deviceId> -k
-H "Private-Token: <token>" -H "Content-Type: application/json"
-d "<device twin JSON goes here>"
Device Twin JSON:
{
  "desired" : [ {
    "t" : 1585645427,
    "v" : 10.0,
    "n" : "urn:dev:ca:tenant:project:device:property"
  } ],
  "reported" : [],
  "currentChannel": "twin-channel"
}
Both desired and reported are JSON arrays
-
desired: State which user/or process is requesting on the device, that state is being sent to the device.
-
reported: Last state that the device reported; device should update this state whenever it receives new desired state and updates its state.
-
currentChannel: Adding this field during Put/Patch requests will trigger sending /state update over given MQTT channel.
GET
To get current device state:
curl -XGET https://<tenant>.<host>/api/projects/<project>/device-twins/<deviceId> -k -H "Private-Token: <token>"Response:
{
  "desired" : [ {
    "t" : 1585645427,
    "v" : 10.0,
    "n" : "urn:dev:ca:ca:project:device:property"
  } ],
  "reported" : [ {
    "t" : 1585645427,
    "v" : 10.0,
    "n" : "urn:dev:ca:ca:project:device:property"
  } ]
}
GET HISTORY
To get history of device state:
curl -XGET https://<tenant>.<host>/api/projects/<project>/device-twins/<deviceId>/history?size=20&since=0&until=2546260198 -k -H "Private-Token: <token>"Where size is maximum number of returned elements and since/until are timestamps in seconds
Response:
{
  "content" : [ {
      "desired" : [ {
        "t" : 1585645427,
        "v" : 10.0,
        "n" : "urn:dev:ca:ca:project:device:property"
      } ],
      "reported" : [ {
        "t" : 1585645427,
        "v" : 10.0,
        "n" : "urn:dev:ca:ca:project:device:property"
      } ],
      "version" : 0,
      "timestampS" : 1599230957
      },
      {
      "desired" : [ {
        "t" : 1585645427,
        "v" : 12.0,
        "n" : "urn:dev:ca:ca:project:device:property"
      } ],
      "reported" : [ {
        "t" : 1585645427,
        "v" : 12.0,
        "n" : "urn:dev:ca:ca:project:device:property"
      } ],
      "version" : 1,
      "timestampS" : 1599230960
      }],
  "links" : {
    "next" : "/api/projects/project/device-twins/device/history?cursor=6LjSnuEdUWlOnw0Wt4gHpp7v9W6y8T7nL8aCEnTywfVmrsCWDsHOzAPuUsreLMTlGqflOXHDllU6tLMeUHWPGRzjdXCNC-xhhPcLP2UiCKI="
  }
}
Where links field is relative URI to query next batch of data,
it can be done using following request:
curl -XGET https://<tenant>.<host>/api/projects/<project>/device-twins/<deviceId>/history?cursor=6LjSnuEdUWlOnw0Wt4gHpp7v9W6y8T7nL8aCEnTywfVmrsCWDsHOzAPuUsreLMTlGqflOXHDllU6tLMeUHWPGRzjdXCNC-xhhPcLP2UiCKI= -k -H "Private-Token: <token>"PATCH
Patch request is used to update desired or reported state of device twin. It does not change omitted fields.
Example PATCH request for new state from device:
curl -XPATCH  https://<tenant>.<host>/api/projects/<project>/device-twins/<deviceId> -k
 -H "Content-Type: application/json" -H "Private-Token: <token>" -d '{patch JSON}'
Request body:
{
  "desired" : [ {
    "t" : 1585645427,
    "v" : 15.0,
    "n" : "urn:dev:ca:ca:project:device:property"
  } ]
}
Response:
{
  "desired" : [ {
    "t" : 1585645427,
    "v" : 15.0,
    "n" : "urn:dev:ca:ca:project:device:property"
  } ],
  "reported" : [ {
    "t" : 1585645427,
    "v" : 10.0,
    "n" : "urn:dev:ca:ca:project:device:property"
  } ]
}
MQTT Device API
Channel setup
Devices communicating with device twin over MQTT must use Channels.
When creating new Channel it is important to set commandControl flag to true.
Example DTO to create channel using POST to Channels API:
```json5
 {
   "id": "myChannel",
   "type": "MQTT",
   "password": "password",
   "devices": [ "dev1", "dev2", "dev3" ],
   "contentType": "application/senml+json",
   "telemetry": true,
   "commandControl": true,
 }
 ```
Channel permissions
Setting commandControl to true gives:
-
write permissions to
cc/<format>/<tenant>/<project>/<channel>/get, -
write permissions to
cc/<format>/<tenant>/<project>/<channel>/update, -
read permission for
cc/<format>/<tenant>/<project>/<channel>/state.
Protocol
{
  "deviceId": <string>,
  "hubId": <string>,
  "messageId": <number - integer>,
  "version": <number>,
  "state": {
    "desired": <application/senml+json>,
    "reported": <application/senml+json>
  },
  "error": <string>
}-
deviceId - used to identify device, multiple devices may access same MQTT channel, this is required to distinguish them.
-
hubId - optional, may be useful for devices behind hubs.
-
messageId - used to corelate requests to responses, it should be integer.
-
version - twin message protocol version, current version is 1.0.
-
state - desired and/or reported state of the device.
-
error - will be non-empty if get/update requests fail.
Topics
-
cc/senml_json/<tenant>/<project>/<channel>/state
Device should subscribe to this topic when it wants to receive responses to /get and /update calls.
Also, if currentChannel is set then this topic receives updates whenever Patch or Put is used.
Messages will not be retained so device can fetch them only if it is subscribed at the moment of emitting.
Payload of state message will contain all available information.
-
cc/senml_json/<tenant>/<project>/<channel>/get
Device should send message to this topic when it wants to receive current state, only part of protocol message is required, ie:
{
  "deviceId": <string>,
  "hubId": <string>,
  "messageId": <number - integer>,
  "version": <number>,
}-
cc/senml_json/<tenant>/<project>/<channel>/update
Device should report its state change by publishing messages to this topic.
Message must contain reported field.
Rule Engine
Basic setup
|
Note
|
If you are familiar with Rule Engine basics, skip to Advanced setup. |
Rule Engine is a tool which allows you to set up certain automatic actions in response to the events satisfying given conditions. The base concepts in Rule Engine are user-defined rules and actions.
Let’s say you want to be notified each time the temperature in your fridge exceeds 10°C. If this happens, you want to receive a request on your endpoint, or get an email. In this case, the condition imposed on the temperature is the rule, and the request or email is an action. Simply put, rules define the conditions that need to be satisfied by the events that arrive to the Platform (and can also describe how the input data will be processed), and when the conditions are met, they signal the actions to be executed. Rules can also signal the actions to be cancelled in some use cases – but this will be covered later.
Rules and actions are not created per device – the rules will be matched against all the events from all the devices if not specified otherwise. You can specify the devices and properties you want to monitor when creating the rule.
Actions include:
-
Sending an email;
-
Sending an HTTP request to a given endpoint;
-
Sending an MQTT message to a given host and topic;
-
Generating a system alert.
Actions can be executed immediately after the event arrives or can be scheduled for later execution. In the later case, a cancellation signal can be used to remove scheduled executions. Let’s stick with the fridge example – imagine you want to be notified when the temperature exceeds 10°C for longer than 10 minutes. So if a correct (lesser than 10°C) temperature event arrives to the Platform within 10 minutes of the first "abnormal", rule-triggering event, the rule engine will send a cancellation signal and prevent the action from happening.
This section consists of two parts – first, you’ll learn the basics of rule engine, and then further possibilities (e.g. transformations and autoresolving) will be described.
Creating your first rule & action
This section provides an example which will walk you through the process of creating a rule. For testing purposes, we’ll create an HTTP action. You can later tailor the details to your needs. As said before, there are two key elements you’ll need to create – a rule and an action. Let’s create a rule first.
|
Note
|
It is not recommended to use the tab "Rules (deprecated)". It is not supported anymore, and will be deleted soon. |
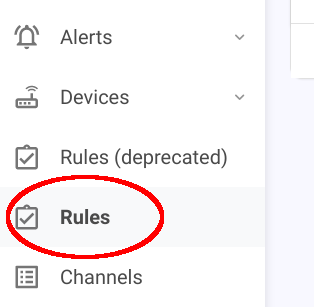
In your project view, go to Rules tab:
Click the "Add new" button to begin creating a new rule. You will see the first step of rule creation wizard.
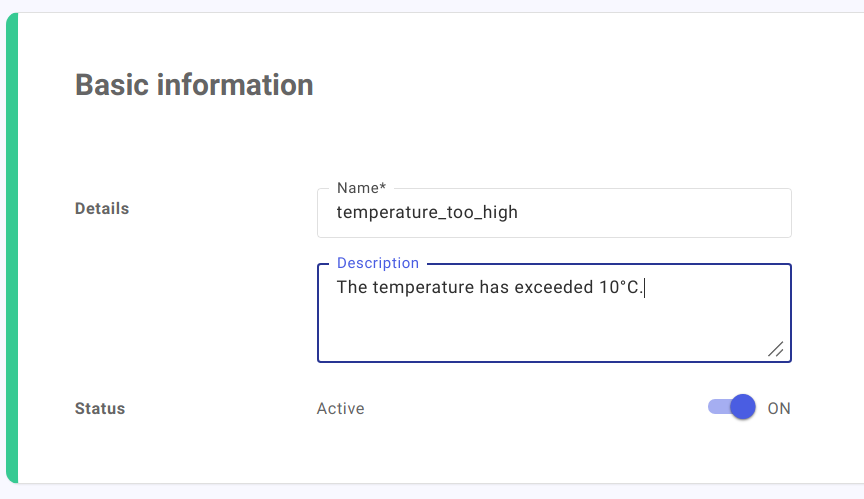
-
Rule name is its identifier and the name shown on the dashboard. It should be informative to your own advantage, and it must be unique.
-
Description allows you to further describe the rule created, with no specific restrictions.
-
Status allows you to initially set the rule as active or inactive. By default, the rule is active.
Click Next. In the second step, you can add transformations. Let’s say the event that allows to the Platform is your input data – this step allows you to transform this data, e.g. choose which property you want to monitor, or which devices should be affected by this rule.
|
Note
|
You will see a banner informing you to create SIGNAL as last operation. SIGNAL is one of many supported methods, all of which are covered in Advanced setup – to create your first rule, you don’t have to know them. Just use SIGNAL as your only method. |
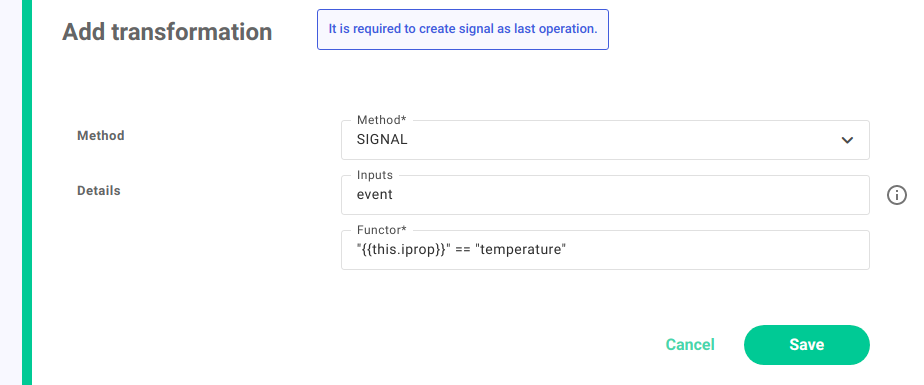
-
Input is the input data of the transformation. For the first transformation, it is the event that arrives to the Platform – simply type
event. -
functoris what allows you to filter the data. In this example, we want the event property (this.iprop) to be equal totemperature:"{{this.iprop}}" == "temperature". This will result in catching temperature information from all the devices.
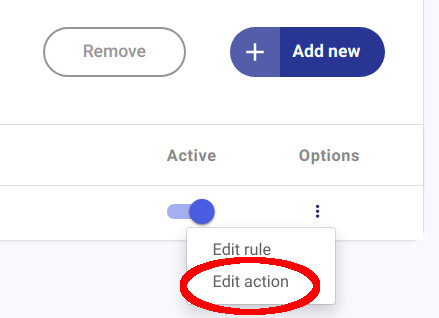
Click "Next" to proceed to the summary and "Add rule" to finish adding the rule. Keep note of the rule name – you will need it to create an action for it. We will now create an action – as an example, we will use the HTTP actioner. Other actions are covered in Advanced setup.
In the Rules view, click on the three dots symbol in the Options column, and select "Edit action":
Click "Add action". You will see action creation wizard. In the first field, "Type", choose "HTTP"; you will see the following fields:
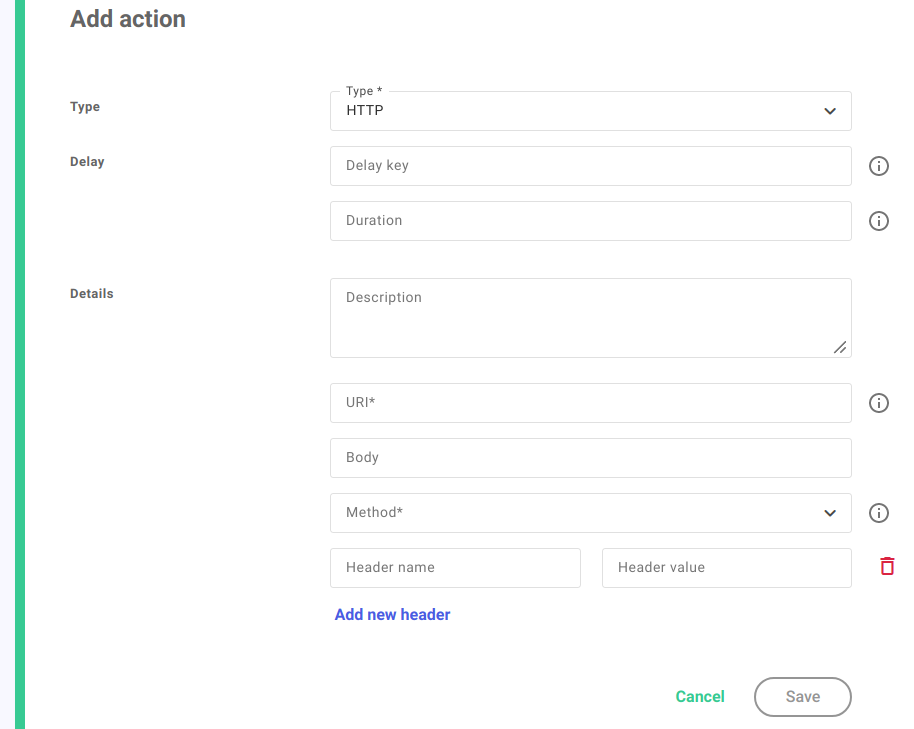
-
Delay allow the actions to be triggered after a set time and are covered in Advanced setup. For now, skip this step;
-
Description should be short and informative of the action, but it is optional;
-
Body is the request body;
-
URI is the endpoint you want to send the request to;
-
Method is the HTTP method you want to use;
-
Headers are optional, but you can specify them in this section. If you are not using any headers, remove them using the trash icon.
Click "Add action". You now can test the rule to see if you configure everything correctly – instructions are covered in Testing rules.
|
Note
|
See Alerts Integration for details about managing alerts. |
Advanced setup
Other actions – alert, MQTT and email
To set up other action in place of the HTTP action described before, simply choose the desired action from the drop-down list.
|
Note
|
Currently, you can see two Alerts tabs which correspond to two versions of the rule engine. The alerts sent by deprecated rule engine will be shown in "Alerts (deprecated)" tab, and the alerts from the new rule engine – in the "Alerts" tab. |
Alert action
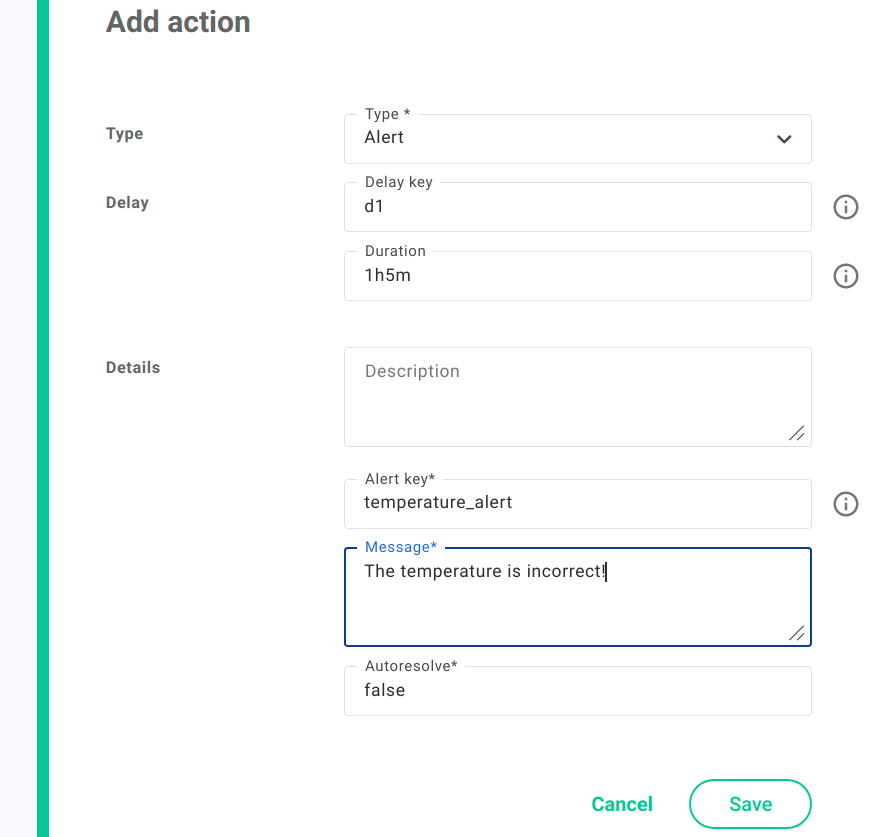
-
Delay key is a unique key which identifies the delay.
-
Delay duration should be input as e.g. '1h5m' for 1 hour and 5 minutes.
-
Alert key causes the alerts with the same key to have multiple occurences instead of creating many rows in the table.
-
Autoresolve makes the alert resolve itself after certain conditions are met.
MQTT action

-
URI – your MQTT host name. Remember to specify the tcp:// protocol;
-
Topic – the MQTT topic you want to write to;
-
Username – the MQTT username of the channel;
-
Password – the MQTT password to the channel;
-
Retained –
trueorfalse, specifies whether this message should be sent to every new subscriber automatically; -
QOS – Quality of Service: 0 or 1, depending on your host settings;
-
Message – the MQTT message you want to publish.
Email action
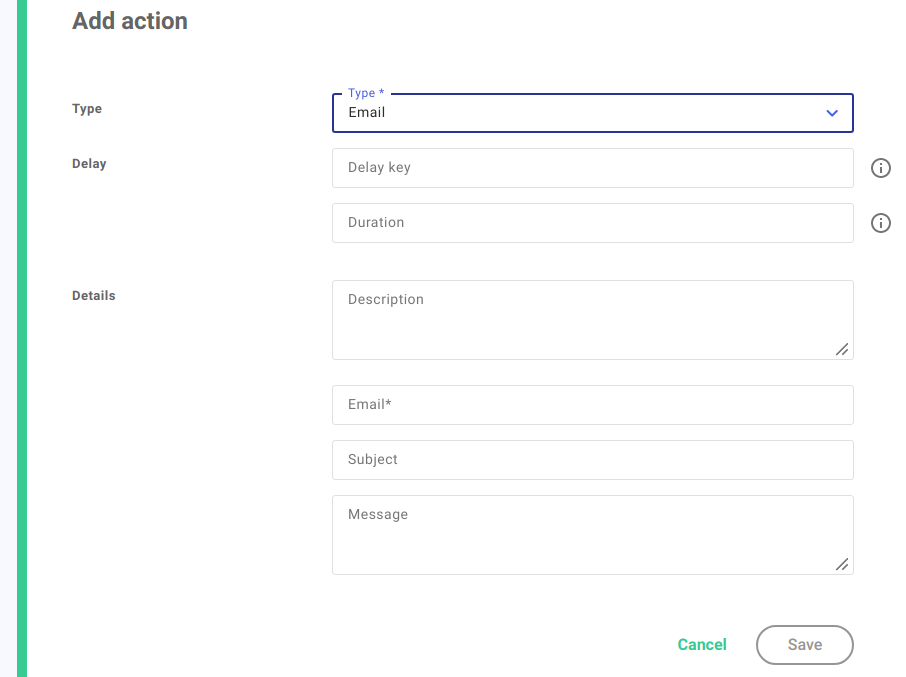
-
Email – the email address of the recipient;
-
Subject – email subject;
-
Message – contents of the email.
Data types
The data types refer to what kind of data arrives to the Platform in an event. The data types used by Rule Engine are:
-
boolean – True or False, e.g. whether the device is online
-
number - IEEE-754 64-bit floating-point number, e.g. the temperature measured by a sensor
-
string - UTF-8-encoded text, e.g. a custom message sent by a device
-
object - equivalent of JSON Object aka "string to any" map
-
array - equivalent of JSON Array
-
any - any of the following types
|
Note
|
Arrays holding specific types are defined as array[type], e.g. array[object] |
Templating
Rule Engine uses templating to inject dynamic data to rules and actions.
|
Note
|
Data available for injection depends on the context and is discussed in detail further down. |
|
Note
|
Under the hood the mustache template engine is used and all the features that come with it can be used. |
|
Note
|
Objects and arrays are injected in json format. |
Whenever user want to use dynamically injected data, they can do so using the following notation.
{{value}}
{{object.child}}
{{object.nested.child}}

{{object}}
{{array}}

{{#array}}-{{.}}
{{/array}}
Which for context of:
{
  "value": 1,
  "object" : { "child": true, "nested": { "child": "foobar"} },
  "array": [1, false, "bazbar"]
}
Evaluates to:
1
true
foobar

{"child":true,"nested":{"child":"foobar"}}
[1,false,"bazbar"]

- 1
- false
- bazbar|
Important
|
Please refer to mustache documentation and examples at the bottom for more details. |
Operators
The following operator are available in Rule Engine:
Arithmetic operations
-
+- add, e.g.2 + 2⇒4 -
-- subtract, e.g.4 - 2⇒2 -
*- multiply, e.g.2 * 4⇒8 -
/- divide, e.g.8 / 2⇒4 -
%- modulo, e.g.5 % 2⇒1 -
**- power, e.g.3 ** 3⇒27 -
>- greater, e.g.2 > 1⇒true -
>=- greater or equal, e.g.2 >= 2⇒true -
<- less, e.g.2 < 4⇒true -
<=- less or equal, e.g.2 <= 2⇒true -
==- equal, e.g.2 == 2⇒true -
!=- not equal, e.g.2 != 4⇒true
Text operators
-
+- add, e.g."a" + "b"⇒"ab"
-
>- greater (by lexical order), e.g."b" > "a"⇒true -
>=- greater or equal (by lexical order), e.g."b" >= "b"⇒true -
<- less (by lexical order), e.g."a" < "b"⇒true -
<=- less or equal (by lexical order), e.g."b" <= "b"⇒true
-
==- equal, e.g."foo" == "bar"⇒false -
!=- not equal, e.g."foo" != "bar"⇒true -
=~- regex LIKE e.g."foo_bar" =~ "foo"⇒true -
!~- regex NOT LIKE, e.g."foo_bar" !~ "baz"⇒true
Logical operations
-
!- not, e.g.!false⇒true -
&&- and, e.g.1 == 1 && "foo" == "foo"⇒true -
||- or, e.g.1 == 2 || "foo" == "foo"⇒true
If one wants to compare strings, they must do so using quoted notation (especially when using templates as strings are injected without quotes) e.g. "first" == "second", "{{n}}" =~ "temperature".
|
Warning
|
All operations in Rule Engine are strongly typed, e.g. 2 is not the same as "2". While some assumptions can be made about the data types (e.g. while using regex logical operator’s) user should always be wary of the data types they are using. Ignoring data types can lead to undefined behavior.
|
|
Important
|
Remember to correctly escape data (e.g. \") when dealing with REST API
|
Functions
During injection functions can be called using mustache "lambda" feature.
Function calls use the following format: {{#functionName}}<arg1>,<arg2>,…{{/functionName}}.
See "functions documentation" section for list of available functions.
|
Warning
|
Functions inside exp.* package are experimental and can change without previous notice.
|
Input Data
Rule Engine is prepared in a way to allow using any JSON-formatted data input, although currently it only accepts telemetry events data sent by the devices in SenML format.
|
Note
|
Comarch Iot Platform uses extensions for the standard SenML fields. Extended fields names usually start with "i". |
SenML data frame is a JSON Array of telemetry data JSON Objects. In the context of IoT Platform telemetry data object is a Device Property defined together with the device (TODO: LINK).
SenML data frame example:
[
  {
    // extension: tenant name as defined by the system administrator
    "it": "tenant_name",
    // extension: project name as defined by the user
    "ip": "project_name",
    // extension: channel name as defined by the user
    "ich": "channel_name",
    // extension: device name as defined by the user
    "idev": "device_name",
    // extension: property name as defined by the user
    "iprop": "property_name",
    // extension: unique identifier for this particular data frame
    "iuuid": "91e2cb40-a105-11eb-9078-fedbf7d090e5",
    "n": "urn::dev::ca::tenant_name::project_name::device_name::property_name",
    // one of v, vb, or vs will be present based on value type (number, boolean, string)
    "v": 10,
    "vb": true,
    "vs": "some_data",
    "t": 1618901291,
    // extension: when the event was processed on IoT Platform side
    "pt": 1618901565
  }
]
Evaluation process
Every data frame (aka event; telemetry send by a device) will start the rules evaluation process:
-
Rule Engine will select rules based on "it" and "ip" fields matching them to rules defined under specific project.
-
Using user defined data transformations event data will build up the transformation context - a data map containing both the original event and all intermediate data which is the result of data transformations.
-
Using user defined signal transformations signals will be sent to actions when specified conditions are met.
|
Note
|
Rules and actions are defined in the context of specific Tenant and Project. That means that under specific project every "it" and "ip" fields will always be the same across all records inside SenML array. |
Rules
Rule is specified with:
-
name - unique name that identifies the rule
-
data transformations - a list of operations used to filter out and calculate new data
-
signal transformations - a list of operations used to signal actions to be executed when specified conditions are met
|
Note
|
Data and signal operations are defined in the same list, so there can be e.g. signal transformations defined in-between data transformations. |
|
Important
|
A rule is considered valid only when it contains at least one signal operation. |
|
Important
|
Rule’s transformations list must always end with a signal transformation for the rule to be considered valid. |
Rule can also be temporarily disabled by the user.
Transformations
When defining a rule, user defines data and signal transformations.
-
Data transformation is a process of preparing the data for rule evaluation that includes data filtering, calculations etc. All output data is saved under user defined keys, building up the data context.
-
Signal transformation is a process of checking whether user-defined conditions are met and if so, signaling the actions to be executed.
-
All transformations can access and inject context data into their functors.
A single transformation is defined by:
-
Inputs - names of array/s which elements will be used in "for-each" fashion by this transformation
-
Operation - name of the operation to be executed
-
Functor - operation-specific function; can use current input element (available as
{{this}}) or previous transformations results; usually evaluates to boolean, string or number -
Output - name under which the result will be stored; result is operation-specific and will be one of data types.
|
Important
|
The original event (SenML telemetry data array) that invokes rule evaluation process is always accessible under a reserved name: event, hence event is of array[object] type, usable as transformation input. Most rules will use this input for the first transformation. |
|
Note
|
Transformation are executed sequentially in the same order as defined in the rule. |
Available transformations
|
Important
|
Transformations are also a way of filtering the data that is relevant for specified rule. If transformation results in empty (e.g. FIND or FIND_ONE produces empty array) rule processing is terminated, and the rule expression is not evaluated. |
Data transformations
-
FIND
-
selects elements from input array[type] and stores them as array[type] under output name
-
selects elements based on functor that must evaluate to boolean, e.g.
"{{iprop}}" == "temperature"" -
terminates on empty result
-
-
FIND_ONE
-
as above, but only selects single element
-
terminates when size of result is != 1 (that is also when more elements match the specified functor).
-
-
MAP
-
selects all elements from input array[object] and maps them to new object fields
-
new object is stored under output name
-
new object has fields constructed from functor that must evaluate to string
-
each new object field stores object from original array
-
-
SUM
-
selects all elements from input array
-
sums their values based on functor that must evaluate to number
-
stores result under output name as number
-
-
MEAN
-
as above, but calculates mean of functor results
-
Signal transformations
-
SIGNAL
-
checks the condition specified in functor (e.g.
{{thermometer.v}} < 20) and if it’s true signals the actions to be executed -
can use optional input to send a signal for each element in the input array, where current element is sent together with the data context under
{{this}}key
-
-
SIGNAL_CANCEL
-
checks the condition specified in functor (e.g.
{{thermometer.v}} >= 20) and if it’s true, a cancellation signal is sent to the actions -
can use optional input to send a cancellation signal for each element in the input array, where current element is sent together with the data context under
{{this}}key.
-
| Transformation | Inputs | Functor | Output | Output type |
|---|---|---|---|---|
FIND |
1 required, e.g. |
Filter. Must evaluate to boolean, e.g. |
Key under which found elements will be saved, e.g. |
array[object] |
FIND_ONE |
1 required, e.g. |
Filter. Must evaluate to boolean, e.g. |
Key under which found element will be saved, e.g. |
object |
MAP |
1 required, e.g. |
Key. Must evaluate to string. Key under which current element will be stored inside output object, e.g. |
Key under which new object (storing elements under functor key) will be saved |
object |
SUM |
1 required, e.g. |
Value to add to total sum. Must evaluate to number, e.g. |
Key under which resulting sum will be saved |
number |
MEAN |
1 required, e.g. |
Value to add to total sum before. Must evaluate to number, e.g. |
Key under which resulting mean will be saved |
number |
SIGNAL |
0 or 1, e.g. |
Condition. Must evaluate to boolean, e.g. |
n/a |
n/a |
SIGNAL_CANCEL |
0 or 1, e.g. |
Condition. Must evaluate to boolean, e.g. |
n/a |
n/a |
In Practice
Let’s take the following (simplified for readability reasons) SenML frame:
[
  { "iprop": "p1", v: 100, ... },
  { "iprop": "c1", v: 10 , ... },
  { "iprop": "c2", v: 20 , ... },
  { "iprop": "c3", v: 30 , ... },
  { "iprop": "c4", v: 40 , ... }
]
The initial transformation context is:
{
  "event": [
    { "iprop": "p1", v: 100, ... },
    { "iprop": "c1", v: 10 , ... },
    { "iprop": "c2", v: 20 , ... },
    { "iprop": "c3", v: 30 , ... },
    { "iprop": "c4", v: 40 , ... }
  ]
}
After transformation of:
| Inputs | Operation | Functor | Output | Description |
|---|---|---|---|---|
|
|
|
|
In original event, find one element where "iprop" is equal to "p1" |
The context is now:
{
  "event": [
    { "iprop": "p1", v: 100, ... },
    { "iprop": "c1", v: 10 , ... },
    { "iprop": "c2", v: 20 , ... },
    { "iprop": "c3", v: 30 , ... },
    { "iprop": "c4", v: 40 , ... }
  ],
  "p" : { "iprop": "p1", v: 100, ... }
}
Moving forward, after following transformations:
| Inputs | Operation | Functor | Output | Description |
|---|---|---|---|---|
|
|
|
|
In original event, find all elements where "iprop" is like "c" |
|
|
|
|
In previously calculated array "cs", map all elements to fields where field name is "iprop", and store them in object named "mapped" |
|
|
|
|
In previously calculated array "cs", sum all elements "v" field and store the result number under "sum" |
|
|
|
|
In previously calculated array "cs", calculate mean of all elements "v" field and store the result number under "mean" |
The context is now:
{
  "event": [
    { "iprop": "p1", v: 100, ... },
    { "iprop": "c1", v: 10 , ... },
    { "iprop": "c2", v: 20 , ... },
    { "iprop": "c3", v: 30 , ... },
    { "iprop": "c4", v: 40 , ... }
  ],
  "p" : { "iprop": "p1", v: 100, ... },
  "cs": [
    { "iprop": "c1", v: 10 , ... },
    { "iprop": "c2", v: 20 , ... },
    { "iprop": "c3", v: 30 , ... },
    { "iprop": "c4", v: 40 , ... }
  ],
  "mapped": {
    "c1": { "iprop": "c1", v: 10 , ... },
    "c2": { "iprop": "c2", v: 20 , ... },
    "c3": { "iprop": "c3", v: 30 , ... },
    "c4": { "iprop": "c4", v: 40 , ... }
  },
  "sum": 100,
  "mean": 25
}
A SIGNAL transformation can now be added with a functor which uses current context:
{{p.v}} == 100 && {{mapped.c1.v}} < {{mapped.c2.v}} && {{sum}} == {{p.v}} && {{mean}} == 25
Which would evaluate to true and send a signal to execute of linked actions.
Together with the signal, the whole context will be also sent and can be injected into actions.
If SIGNAL operation has no inputs, th context will be the same as presented above.
If one would set the input to e.g. ["cs"], a signal will be sent for every input element that matches the condition, e.g. {{this.v}} < {{p.v}} (accessing both current element and previously found "p", saved in the context above). In this case a context will also include additional "this" element with data equal to currently processed input element, e.g.:
{
  "event": [
    { "iprop": "p1", v: 100, ... },
    { "iprop": "c1", v: 10 , ... },
    { "iprop": "c2", v: 20 , ... },
    { "iprop": "c3", v: 30 , ... },
    { "iprop": "c4", v: 40 , ... }
  ],
  "p" : { "iprop": "p1", v: 100, ... },
  "cs": [
    { "iprop": "c1", v: 10 , ... },
    { "iprop": "c2", v: 20 , ... },
    { "iprop": "c3", v: 30 , ... },
    { "iprop": "c4", v: 40 , ... }
  ],
  "mapped": {
    "c1": { "iprop": "c1", v: 10 , ... },
    "c2": { "iprop": "c2", v: 20 , ... },
    "c3": { "iprop": "c3", v: 30 , ... },
    "c4": { "iprop": "c4", v: 40 , ... }
  },
  "sum": 100,
  "mean": 25,
  "this": { "iprop": "c1", v: 10 , ... }
}
Actions
Once rule has been triggered, an action can be executed.
Actions are defined separately from rules, so that multiple actions can be made for a single rule. When creating action definition, rule name has to be provided to specify which rule will invoke the action.
When triggered, all the transformed rule context is sent together with rule name to action executors. Next, all actions with matching rule name will be invoked.
Context data can be used to enrich action properties, e.g. while populating email action properties.body:
Mean temperature below {{mean_temperature}}!for context of:
{
  ...
  "mean_temperature": 22,
  ...
}
evaluates to:
Mean temperature below 22!Delayed Actions
Actions can be delayed, so that the execution happens after specified period of time. In order to do so, a delay duration (minimum 1 minute) and key must be specified.
The delay key can be static or use injected data to create delayed action based on e.g. specific device and/or property. All context data can be injected into the key using the same injection format, e.g. key: "{{this.idev}}_{{this.iprop}}".
When delayed action receives a signal execution is scheduled to run after specified delay. In the meanwhile a cancellation signal can be used to cancel the execution.
|
Important
|
When delayed action receives another signal when an execution for resulting key is already scheduled, existing scheduled execution is replaced with a new one and only the new one will be executed in the future. |
|
Note
|
All scheduled execution properties are injected when scheduling the execution, e.g. if an action is using some injected variables (see chapter below) the variables are retrieved at the time of scheduling and not when the action is later executed. |
|
Note
|
All scheduled executions are also cancelled each time a connected action is updated or removed. |
User Variables Integration
User Variables Service is integrated with Rule Engine.
All defined variables are accessible within both rules and actions using notation {{variables.VARIABLE_NAME}}.
Variables can be injected to:
-
rule transformation functor
-
rule expression
-
action properties
Example:
For defined user variable TEMPERATURE_LOW_ALERT_THRESHOLD = 22
-
Rule expression can be defined as
{{mean_temperature}} <= {{variables.TEMPERATURE_LOW_ALERT_THRESHOLD}}. -
HTTP action properties.body can be defines as
Mean temperature {{mean_temperature}} below threshold: {{variables.TEMPERATURE_LOW_ALERT_THRESHOLD}}!
Alerts Integration
User can integrate with Alerts using a special alert action.
|
Note
|
All alerts created by Rule Engine can be found under rules component.
|
Alert Key
As every alert needs a unique key for deduplication, user is responsible for creating it when defining the action.
The deduplication key is stored under properties.key string and - as all action properties - can use injected content, so it can resolve to a concrete value based on signal context.
|
Important
|
Alert keys must be unique across your project. E.g. if two different alert actions generate the same alert key, e.g. {{this.idev}}, generated alerts can override each other. If that is not user’s intent, prefixing the key with e.g. rule name: battery_low_{{this.idev}} is usually enough.
|
Auto resolving alerts
Alerts generated by Rule Engine can be automatically resolved based on cancellation signal.
If such signal is generated from the rule and action property properties.autoResolve evaluates to "true", previously generated alert will be deactivated.
Examples
All examples are based on REST API.
Send a MQTT message for every temperature property. Use different topic for each device.
Rule:
{
  "rule": "forward_events",
  "transformations": [
    {
      "inputs": [ "event" ],
      "operation": "FIND",
      "functor": "\"{{this.iprop}}\" == \"temperature\"",
      "output": "thermometers"
    },
    {
      "inputs": [ "thermometers" ],
      "operation": "SIGNAL",
      "functor": "true"
    }
  ],
  "disabled": false
}
or just:
{
  "rule": "forward_events",
  "transformations": [
    {
      "inputs": [ "event" ],
      "operation": "SIGNAL",
      "functor": "\"{{this.iprop}}\" == \"temperature\""
    }
  ],
  "disabled": false
}
MQTT Action (as already mentioned before):
{
  "rule": "forward_events",
  "disabled": false,
  "properties": {
    "uri": "tcp://{{variables.MQTT_HOST}}:{{variables.MQTT_PORT}}",
    "topic": "my_topic.{{this.idev}}",
    "qos": "1",
    "message": "{{this.v}}",
    "retained": "false"
  }
}
Send HTTP Request with list of event values
Rule:
{
  "rule": "forward_all_events",
  "transformations": [
    {
      "operation": "SIGNAL",
      "functor": "true"
    }
  ],
  "disabled": false
}
HTTP Action:
{
  "rule": "forward_all_events",
  "disabled": false,
  "properties": {
    "uri": "https://{{variables.HTTP_ENDPOINT}}/telemetry",
    "method": "POST",
    "body": "{{#event}}- {{idev}}: {{v}}\n{{/event}}"
  }
}
Detect missing events from devices that should send one every hour
Rule:
{
  "rule": "detect_missing_events",
  "transformations": [
    {
      "inputs": [ "event" ],
      "operation": "SIGNAL",
      "functor": "true"
    }
  ],
  "disabled": false
}
Email Action:
{
  "rule": "detect_missing_events",
  "disabled": false,
  "properties": {
    "to": ["static.email@server.com", "{{variables.ALERT_EMAIL}}@server.com"],
    "subject": "Missing events from {{this.idev}}",
    "body": "Device {{this.idev}} failed to deliver events in expected time"
  },
  "delay": {
    "key": "{{this.idev}}",
    "duration": "1h5m"
  }
}
The refrigerator doors can be opened for 2 minutes before rising the alarm
Rule:
{
  "rule": "fridge_doors",
  "transformations": [
    {
      "inputs": [ "event" ],
      "operation": "SIGNAL",
      "functor": "\"{{this.iprop}}\" == \"doors\" && \"{{this.vs}}\" == \"open\""
    },
    {
      "inputs": [ "event" ],
      "operation": "SIGNAL_CANCEL",
      "functor": "\"{{this.iprop}}\" == \"doors\" && \"{{this.vs}}\" == \"closed\""
    }
  ],
  "disabled": false
}
Email Action:
{
  "rule": "fridge_doors",
  "disabled": false,
  "properties": {
    "to": ["static.email@server.com", "{{variables._EMAIL}}@server.com"],
    "subject": "Doors left open: {{this.idev}}",
    "body": "Doors in fridge {{this.idev}} were open for more than 2 minutes!"
  },
  "delay": {
    "key": "{{this.idev}}",
    "duration": "2m"
  }
}
Alert Action:
{
  "rule": "fridge_doors",
  "disabled": false,
  "properties": {
    "key": "fridge_doors_{{this.idev}}",
    "message": "Doors left open: {{this.idev}}!",
    "autoResolve": "true"
  },
  "delay": {
    "key": "{{this.idev}}",
    "duration": "2m"
  }
}
Functions documentation
|
Warning
|
Functions inside exp.* package are experimental and can change without previous notice.
|
Stable
Experimental
-
exp.time.fmt
Format time using format compatible with strftime function (please refer to man 3 strftime). Note that E and O modifier characters are not supported.
-
Arguments:
-
1: Number: seconds, e.g.
1636364771,1.636364771e+09,{{this.t}} -
2: String: time format, e.g.
"%Y-%m-%dT%H:%M:%SZ"
-
-
Examples:
-
{{#exp.time.fmt}}1636018877,%Y %m %d{{/exp.time.fmt}} ⇒ 2021 11 04 -
{{#exp.time.fmt}}1.636018877e+09,%Y %m %d{{/exp.time.fmt}} ⇒ 2021 11 04 -
{{#exp.time.fmt}}{{this.t}},%Y-%m-%dT%H:%M:%SZ{{/exp.time.fmt}} ⇒ ISO8601 format
-
Testing rules
The rules and actions can be complicated to grasp at the beginning. This sections provides you with high-level tools to verify proper setup of your rules and actions.
HTTP – Request Catcher
A simple and useful tool for testing HTTP requests is https://requestcatcher.com/. Here, you can specify the address you want to temporarily use for demonstration. You can type your application or company name for testing purposes.
After clicking "Get started", you will probably see the message "No requests have been received yet". Under the message, you can see a sample command you can use in your Bash Shell to test it. To test a rule you are creating, specify the uri field accordingly:
"uri": "https://{your-address}.requestcatcher.com/test"When a request arrives to the site, you can see its details, as specified in the HTTP action:
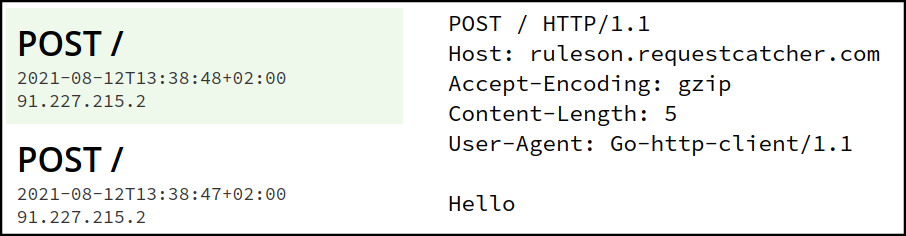
The result of a request caught by Requestcatcher.
Mosquitto (MQTT)
To test MQTT connection, you can use dedicated Mosquitto’s test server.
|
Warning
|
Remember not to send any sensitive data to the server, as it is publicly available. |
Create the following script:
mosquitto_sub -h test.mosquitto.org -t rule-engine-test -vThis script will subscribe to topic rule-engine-test on server test.mosquitto.org. Do not close the terminal. When creating the rule in the rule engine, simply enter tcp://test.mosquitto.org:1883 as host and rule-engine-test as topic – this means that whenever a specified condition is met, a message will be published to the topic. Send an event from the device. If you have configured the rule correctly, MQTT action will be triggered and you’ll see a message in the terminal.
Email actioner is the simplest one to test, as you can just use your address. However, if you don’t want to provide a real address or are afraid you will get too many emails, you can use one of many 10-minute mails. A temporary email address will be generated for you. An example of such a site is https://10minutemail.net.
Managing the roles
This section provides detailed description about scopes and limits of particular roles.
Guest is only here to view the project. They can’t see any dashboards or widgets, edit devices, channels or rules, or create new ones.
Technician has editing access to dashboards, widgets, channels and rules, but they can’t manage users in the project.
Owner, beyond the scope of the technician, can manage other members of the project and change their roles.
Accounting
When you use the Platform, you pay proportionally to the amount of data you used. The data is used when you send some information to the Platform or retrieve it. The accounting module is responsible for tracking the resource consumption. We implemented it through a system which can be divided into three components: an agent, responsible for tracking the usage of the data, storage, and a REST API allowing you to track the consumption yourself.
|
Warning
|
The storage only contains data from the last two months. If you need older accounting history, you’ll need to back it up on your side. |
Device history
The Platform implements the cold-warm-hot data framework, which allows for fast and reliable data retrieving. From the user’s point of view, the history of properties sent by the device can be displayed in a couple of ways.
Visualizing data from devices
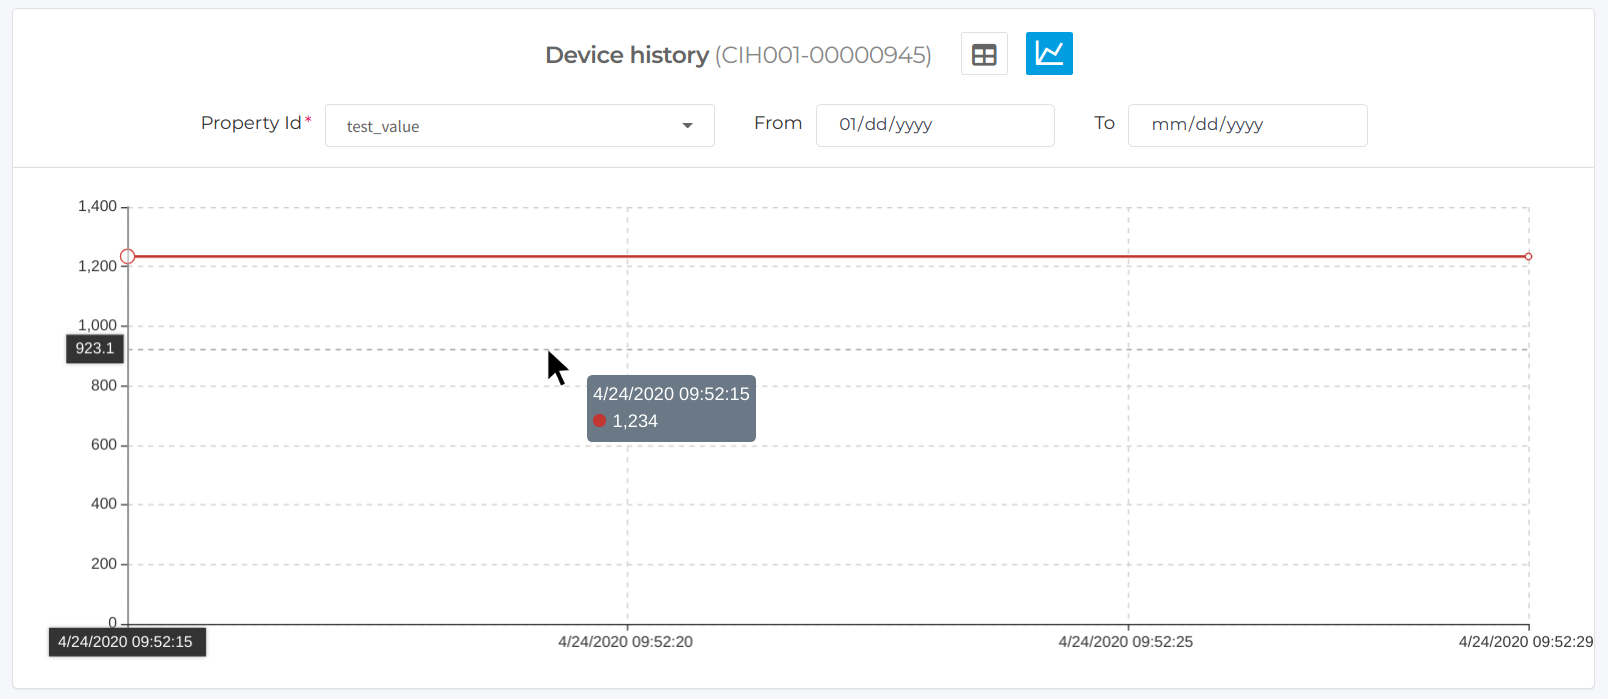
Every device sends values of the declared properties to the platform. The device history can be seen either in a form of a list or as a graph. To view device history, click on the three dots next to the device, and select "Show device history":

The default form of viewing device history is a table. Here, you can switch to graph view (A), choose the property to be displayed (B) or choose the date range to filter the displayed results ©:
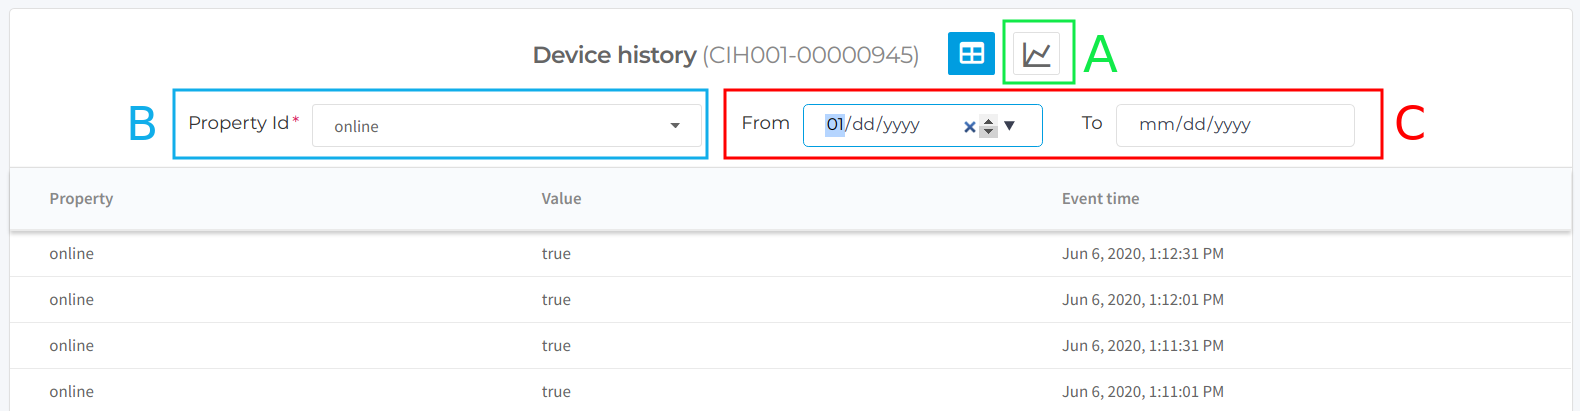
Moving the mouse above the graph lets you see precise coordinates of the point and the property value at this point (in this case, 1 234).
[Beta] Adapters
Adapters allow to connect Devices with custom JSON formats. To allow this first you need to create specification in JOLT that will translate messages sent by your Devices to supported SenML over JSON.
|
Note
|
Currently Adapters are in Beta version and don’t have UI part. |
First Adapter
-
Create Device
d1without channel in Platform. Refer to Connecting your first device.We assume that Device will be connected to tenant
t1and projectp1and it sends messages like this one{ "deviceId": "d1", "x": 15, "y": 12, "z": 0, "message": "test message" } -
Go to OpenAPI page and open
Channelssection -
There you will see
PUT /api/projects/{project}/adapters/{adapter} -
Create adapter with name
testusing below specification in JOLT[ { "operation": "shift", "spec": { "message": { "$": "[#2].n", "@": "[#2].vs", "@(1,deviceId)": "[#2].bn" }, "x": { "$": "[#2].n", "@": "[#2].v", "@(1,deviceId)": "[#2].bn" }, "y": { "$": "[#2].n", "@": "[#2].vs", "@(1,deviceId)": "[#2].bn" }, "z": { "$": "[#2].n", "@": "[#2].v", "@(1,deviceId)": "[#2].bn" } } }, { "operation": "modify-overwrite-beta", "spec": { "*": { "bn": "=concat('urn:dev:ca:t1:p1:',@(1,bn),:)" } } } ] -
Create Channel that will open connection between Device and Adapter using
POST /api/projects/{project}/channelswith body{ "id": "c1", "type": "MQTT", "adapter": "test", "password": "yoursecretpassword", "devices": [ "d1" ], "enabled": true } -
Channel will be visible like any other channel in Platform and will be usable in the same way. Note that instead of
tlm/senml_json/…there will betlm/adapter_name/…
Testing Adapter
We know that JOLT isn’t the easiest tool, but it is for sure flexible. To help you with creating proper specification we have test endpoint.
-
Go to OpenAPI page and open
Channelssection -
There you will see
POST /api/projects/{project}/adapter-validation
Ready to use specifications
To save time we’ve prepared some most common JOLT specifications.
|
Note
|
Currently the only way to tell which Device is sending message is by providing DeviceID inside of such message. |
Single message without Device Identity
inputJson:
{
  "property": "test",
  "value": 5
}
spec:
[
  {
    "operation": "shift",
    "spec": {
      "property": "[0].name",
      "value": "[0].v"
    }
  },
  {
    "operation": "modify-default-beta",
    "spec": {
      "*": {
        "device": "common_device",
        "bn": "=concat(urn:dev:ca:tenant:project:,@(1,device),:,@(1,name))"
      }
    }
  },
  {
    "operation": "remove",
    "spec": {
      "name": ""
    }
  }
]
Array of messages without Device Identity
inputJson:
[
  {
    "property": "test",
    "value": 5
  },
  {
    "property": "test2",
    "value": 8
  }
]
spec:
[
  {
    "operation":"shift",
    "spec":{
      "*":{
        "property":"[&1].name",
        "value":"[&1].v"
      }
    }
  },
  {
    "operation":"modify-default-beta",
    "spec":{
      "*":{
        "device":"common_device",
        "bn":"=concat(urn:dev:ca:tenant:project:,@(1,device),:,@(1,name))"
      }
    }
  },
  {
    "operation":"remove",
    "spec":{
      "*":{
        "name":""
      }
    }
  }
]
Single message with device identity
inputJson:
{
  "device":"d1",
  "property":"test",
  "value":5
}
spec:
[
  {
    "operation": "shift",
    "spec": {
      "property": "[0].name",
      "device": "[0].id",
      "value": "[0].v"
    }
  },
  {
    "operation": "modify-default-beta",
    "spec": {
      "*": {
        "bn": "=concat(urn:dev:ca:tenant:project:,@(1,id),:,@(1,name))"
      }
    }
  },
  {
    "operation": "remove",
    "spec": {
      "name": ""
    }
  }
]
Array of messages with device identity
inputJson:
[
  {
    "device":"d1",
    "property":"test",
    "value":5
  },
  {
    "device":"d1",
    "property":"test2",
    "value":8
  }
]
spec:
[
  {
    "operation":"shift",
    "spec":{
      "*":{
        "property":"[&1].name",
        "device":"[&1].id",
        "value":"[&1].v"
      }
    }
  },
  {
    "operation":"modify-default-beta",
    "spec":{
      "*":{
        "bn":"=concat(urn:dev:ca:tenant:project:,@(1,id),:,@(1,name))"
      }
    }
  },
  {
    "operation":"remove",
    "spec":{
      "*":{
        "name":""
      }
    }
  }
]
Message without Device Identity and with multiple values
inputJson:
{
  "time": "2021-07-20T12:00",
  "a": 5,
  "b": "asd"
  "switch": true
}
spec:
[
  {
    "operation": "shift",
    "spec": {
      "time": {
        "$": "[#2].n",
        "@": "[#2].vs"
      },
      "a": {
        "$": "[#2].n",
        "@": "[#2].v"
      },
      "b": {
        "$": "[#2].n",
        "@": "[#2].vs"
      },
      "switch": {
        "$": "[#2].n",
        "@": "[#2].vb"
      }
    }
  },
  {
    "operation": "default",
    "spec": {
      "*": {
        "bn": "urn:dev:ca:tenant:project:devID:"
      }
    }
  }
]
Message with Device Identity and multiple values
inputJson frame of :
{ "deviceId": "abc", "x": 15, "y": 12, "z": 0, "message": "test message" }
spec:
[
  {
    "operation": "shift",
    "spec": {
      "message": {
        "$": "[#2].n",
        "@": "[#2].vs",
        "@(1,deviceId)": "[#2].bn"
      },
      "x": {
        "$": "[#2].n",
        "@": "[#2].v",
        "@(1,deviceId)": "[#2].bn"
      },
      "y": {
        "$": "[#2].n",
        "@": "[#2].vs",
        "@(1,deviceId)": "[#2].bn"
      },
      "z": {
        "$": "[#2].n",
        "@": "[#2].v",
        "@(1,deviceId)": "[#2].bn"
      }
    }
  },
  {
    "operation": "modify-overwrite-beta",
    "spec": {
      "*": {
        "bn": "=concat('urn:dev:ca:tenant:project:',@(1,bn),:)"
      }
    }
  }
]
Bootstrap/Firmware Update
Bootstrap component provides a configuration to Devices and Device groups. Devices can periodically check Bootstrap server to get list of attached configurations and update them to newer versions. Communication from devices to the Bootstrap server is encrypted using AES 128-CBC and pre-shared key.
|
Note
|
To use bootstrap API you need to be ADMIN of Tenant or have API Key with these privileges. |
Configure first Device
In this guide we will assume few things for our configuration:
-
Tenant is
tenant1 -
Device is
device1 -
Manufacturer of Device is
comarch -
Device is of type
iot_gateway -
It is first revision of Device
Let’s get started.
-
To create configuration we will need to generate Device Key first. You can use https://www.base64encode.org/ and feed it with 16 characters password to generate proper base64 key. We will assume that
testdevice123456was used and in base64 it isdGVzdGRldmljZTEyMzQ1Ng== -
Fill in
hardwareIdwithdevice1and request body with{ "hwVendor": "comarch", "hwType": "iot_gateway", "hwRevision": "1", "deviceKeyBase64": "dGVzdGRldmljZTEyMzQ1Ng==" } -
With this we’ve created our first Device configuration description. Our device can connect to Platform to download its encrypted list of configurations
Get Device configurations
-
Following from configuring your first Device we now have our
device1in the system. For device to download list of available configurations it needs to use public API endpoint -
Fill in
hardwareIdwithdevice1and click execute. You should get encrypted base64 response similar to this onetBbuLbAckadC57VfNtaF8A==OtHynd2aodghwJhP6+WTtVSC8Lh4Mg2nwmJjDklTWlHuH8v29mqEHvKRP1NNkJ7ZsvalkssKVddM01Ch5677RAT3K7S/9KxTZBCFSn2/n6I= -
Cut out first 24 characters as these are AES-128 IV (initialization vector) part and paste it into
IVfield. The rest of response (starting fromOtHy…) should go intoinput -
After doing it we will still see error
Decryption failed!. Just paste our key used for this device, which isdGVzdGRldmljZTEyMzQ1Ng==intokeyfield -
You should get
{"hwVendor":"comarch","hwType":"iot_gateway","hwRevision":"1","items":[]} -
Now we will get through uploading configuration file
Uploading first configuration file
-
Go to Upload File
-
Now we can decide of what
typeis the file, e.g. firmware, configuration, ssh. For our simple case purpose we will assume that we want to send connectivity information to our device, so type inconnectivity -
Type in
demointovariantfield as we are using this file fordemopurpose -
Set
versionto1 -
Select file that you want to download. Best option will be to use something human friendly like
.txtor.jsonas we will be downloading it later on -
Click
Executeand you should get response with file info -
Now we need to let our device know about this file
Create configuration for Device
-
Set
hardwareIdtodevice1,typetoconnectivity,varianttodemoand leave version as_newest. Click execute -
You should get
{ "type": "connectivity", "variant": "demo", "version": "_newest" } -
Now you can once again download configuration as device, but now you will see new item similar to
{"type":"connectivity","variant":"demo","version":{"version":"1","timestampS":1630327645},"location":"https://tenant1.comarch-iot.com/bootstrap/api/files/612cd35d31f0b845d3048ab9?hardwareId=device1","digest":"f25ee2b822739baa641a1296abd042a0291e546b","encrypted":true}Download it using
locationurl -
Downloaded file need to be decrypted using AES-128 CBC. You can use https://string-o-matic.com/aes-decrypt, but you will need to change encoding to
ISO-8859-1and ignore not printable characters
Create group configuration
Previously we were targetting single Device, but in real life we will have hundreds of devices that need to have the same configuration.
-
All fields with
hwprefix describe your devices and the rest is for files. Fill form with values-
hwvendor = comarch
-
hwtype = iot_gateway
-
hwrevision = 1
-
type = connectivity
-
variant = demo
-
-
You can verify it by creating new Device with the same
hwfields as set here and later downloading it
Alerts
Events generated by IoT Platform are managed by Alerts component.
Right now alerts can be generated from the following components:
(The id in brackets can be used in API to filter the relevant alerts)
-
Breached Security Policy (security-policies)
-
Rune Engine, based on user defined alert action (rules)
Each alert contains metadata that are helpful in identifying the cause and resource that generated the alert, e.g. security policy or device ids.
To ensure user is not overloaded with alerts, each of the latter contains an alert key. Those are unique within a project and only one alert with given key can be active at a time. Duplicated alerts simply increase alert occurrence counter and (optionally) updates its alert metadata. For example, a breached security policy will generate alert key for each channel on which the breach happened. That means that only one alert per channel can be active at a time for given policy.
Users can deactivate alerts manually using the API.
Applications
Applications in IoT Platform allow clients for integration with external systems. An application gives the possibility to create up to two application-level API Keys with project-level permissions. A project can have up to 10 applications.
|
Note
|
Application-level API Keys cannot be shared between multiple project. |
Application-level API Keys are to be attached in HTTP requests using Private-Token request header or in WebSockets during authorization. The workflow is the same as in the case of personal API Keys.
Applications are available within project menu. Entering the applications page, gives the list of existing applications with a button for new application creation. Each application has its list of API Keys.
|
Note
|
Application displays only ID of the API Key. The value of API Key is displayed only after creation and is no longer available. |
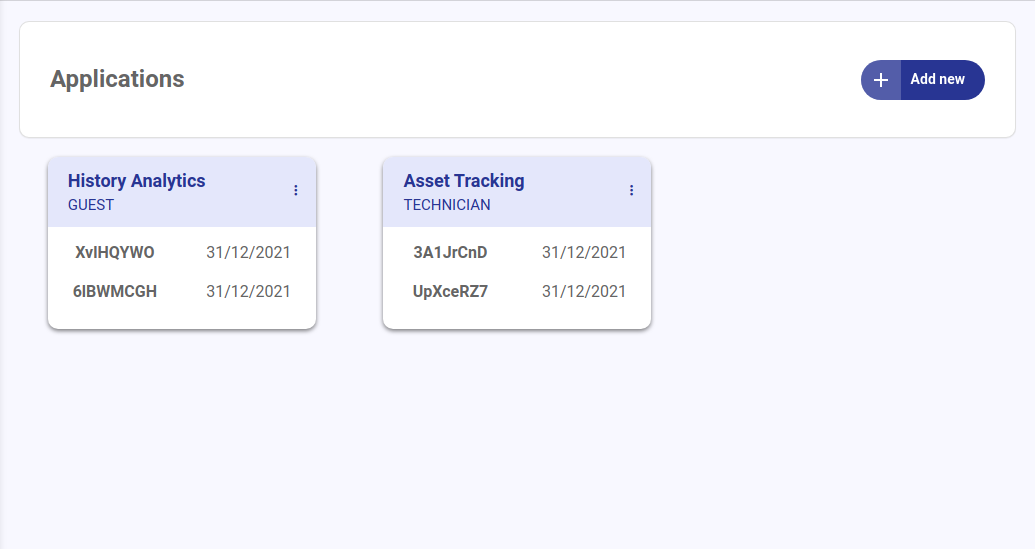
Each application contains its API Keys, labelled with creation date.
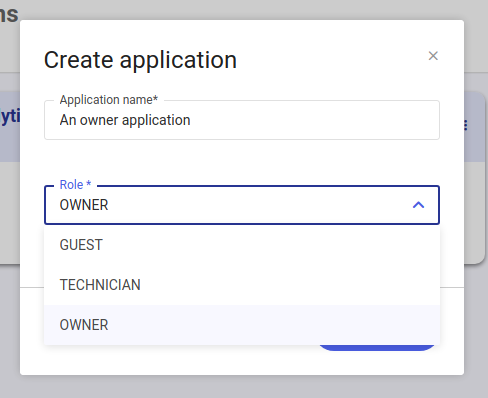
After pressing the Add new button, user has to enter the name for an application and its role.
|
Note
|
Name must be unique. |
Newly created application is added on top of the list. Right after creation no API Key is available and user must create these individually.
The purpose of having two API Keys in each application is to allow API Keys rotation without downtime. System which integrates with IoT Platform should use both API Keys and the one for default usage. When the default API Key fails, integrated application should switch to a secondary. Such procedure should allow systems to rotate API Keys without having a temporary downtime.
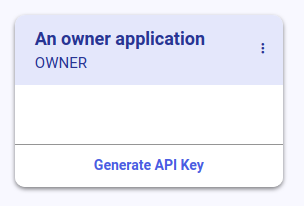
Creation of API Key doesn’t require providing any additional information. A panel with API Key value is displayed and user must copy it and store it safely. After this panel is closed, given API Key will never be displayed again.
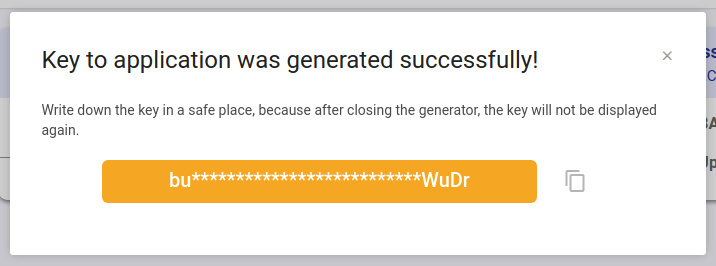
For security and rotation purposes it’s possible to delete each API Key individually or whole application. Note that it’s up to integrated application to be able to handle multiple API Key with a fallback mechanism.
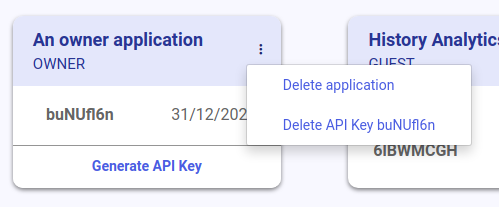
Differences between Application API Keys and Personal API Keys
Personal API Keys are bound to single user. This means that if user is blocked or users permission had changed, the change will affect personal API Keys and applications which are using these. Moreover, a single user can have access to many projects but integrated system requires only one of these and having access to others could be considered a security risk.
It’s recommended to use Application API Keys for integration between systems and IoT Platform.
It’s recommended to use Personal API Keys for utility tools, which can perform large tasks on behalf of the user, by accessing REST API in his (or her) name.
Websockets
Websockets are primary way to connect 3rd party application to the platform.
Quick start
Websocket API uses simple text protocol thus basically any websocket client capable to send and receive text messages will work. This tutorial will use [wscat](https://github.com/websockets/wscat) as exemplary tool.
Install necessary tools
Ensure that you have [npm](https://www.npmjs.com) installed in your system.
Install [wscat](https://github.com/websockets/wscat):
npm install -g wscatUsage
First step is to get URL to websocket service:
curl --insecure https://<tenant>.<host>/api/projects/<project>/wsroute --header Private-Token:<MY-TOKEN>Response:
{ "url" : "wss://<ws-address>/ws" }Next use given url to connect to websocket:
wscat -n -c wss://<ws-address>/ws -H X-Tenant-Name:<tenant>After successful connection, authenticate yourself:
{ "a" : { "pt" : "<MY-TOKEN>"}}
{ "type" : "ok", "ok" : { "code" : "OK" }}
Then subscribe to selected project:
{ "s" : { "p" : "myproject" } }
{ "type" : "ok", "ok" : { "code" : "OK" }}
Now, start to receive asynchronous messages:
{ "type" : "telemetry_senml", "telemetry_senml" : [{ "n" : "urn:dev:ca:ca:myproject:abc:battery_level", "t" : 1.581693781E9, "vs" : "90", "u" : "%", "ich" : "channel-id" }],"continueToken" : "DLQ6m2ClQZ2kQAV" }Which is equivalent to:
{
  "type": "telemetry_senml",
  "telemetry_senml": [{
    "n": "urn:dev:ca:ca:myproject:abc:battery_level",
    "t": 1581693781,
    "vs": "90",
    "u": "%",
    "ich":"channel-id"
  }],
  "continueToken": "DLQ6m2ClQZ2kQAV"
}
Like in SenML, value may be carried in the the 4 various fields - vs, v, vb, vd, depending on value’s type.
Note that the response is a json array and may be more than one element in the array. For easier API consumption telemetry messages sent via websockets are always resolved.
Telemetry output contains ich extension that corresponds to original message channel id.
The websocket gateway has 50 seconds idle timeout. It breaks connection if no traffic via websocket by 50s.
Therefore clients need periodically (e.g. every 30s) send websocket ping message to prevent connection break.
In-depth protocol description
Obtain URL
First step is to get URL to websocket service:
curl --insecure https://{host}/api/projects/<PROJECT>/wsroute --header Private-Token:<MY-TOKEN>Response:
{ "url" : "wss://<HOST>:<PORT>/ws" }WsServer checks while subscription if the address matches to the address that will be calculated by WsRoute.
If the address is correct, the service will return a message:
{ "type" : "ok", "ok" : { "code": "OK" }}or if address is not correct while subscribing the WsServer responses with error:
{ "type" : "error", "error" : { "code" : "CLIENT_ERROR", "message" : "Invalid connection address" }}Connect
To connect to the WsServer use URL address obtained in previous step.
wscat -n -c wss://{host}/ws -H X-Tenant-Name:{tenant}After successful connected WsServer wait for authentication in 5 seconds. In this time WsClient should send authenticate request or else WsServer automatically disconnect unused connection. This mechanism prevents from too much unused connections.
Disconnected (code: 1011)Authenticated
After successful connection, authenticate yourself:
{ "a" : { "pt" : "<MY-TOKEN>"}}Subscribe for resources
To subscribe to selected project send request:
{ "s" : { "p" : "<PROJECT>" }}Project name is used for authentication, it is a scope for obtained data.
If you do not have credential for selected project WsServer responses with error:
{ "type" : "error", "error" : { "code" : "CLIENT_ERROR", "message" : "Unauthorized" }}Subscription being done in default for all data type appearing in project, to enable sub-select of different type of data a concept of Resources has been introduced in WsServer. Subscribing for resources is optional, also may be given as resources list.
Available resources
-
telemetry_senml- device logs data -
alert- user defined notifications -
device- platform event from device inventory service -
channel- platform event from channels service -
provisioning- platform event from device inventory service while using provisioning API
{ "s" : { "project" : "<project>", "resources" : ["telemetry_senml", "alert"]}}Filters
Subscription being done in default for all messages appearing in project, to enable filtering messages a concept of Filters has been introduced in WsServer. Filters are optional and can be given as a map of keys expected in the message and their acceptable values. Filters work only for numeric, text and logical values.
{ "s" : { "project" : "<project>", "filters" : { "<key1>" : [ "value1", "<value11>" ], "key2" : [ "value2", "<value22>" ]}}}Continue Token
Continue token is used for re-subscription for older messages, it is kind of rewind mechanism in case of disconnection or other gaps in receiving messages. This mechanism has restriction: max time of rewind is 30 min.
Continue token is given within every message so may be save by WsClient from last properly consumed message and reused in case of rewind request.
{ "s" : { "project" : "<project>", "resources" : ["telemetry_senml"], "continueToken" : "<token>" }}Types of frames
Authentication request
{ "authentication" : { "privateToken" : "<private-token>" }}Equivalent, shorthand form:
{ "a" : { "pt" : "<private-token>" }}{ "auth" : { "pt" : "<private-token>" }}Subscription request
Default subscription message:
{ "subscription" : { "project" : "<project>" }}Subscription for resource:
{ "subscription" : { "project" : "<project>", "resources" : ["telemetry_senml"]}}Equivalent, shorthand form:
{ "s" : { "p" : "<project>", "r" : ["telemetry_senml"]}}Subscription with filters:
{ "subscription" : { "project" : "<project>", "filters" : { "<key1>" : [ "value1", "<value11>" ], "key2" : [ "value2", "<value22>" ]}}}Equivalent, shorthand form:
{ "s" : { "p" : "<project>", "f" : { "<key1>" : [ "value1", "<value11>" ], "key2" : [ "value2", "<value22>" ]}}}Subscription with last message token
{ "subscription" : { "project" : "<project>", "resources" : ["telemetry_senml"], "continueToken" : <token> }}Equivalent, shorthand form:
{ "s" : { "p" : "<project>", "r" : ["telemetry_senml"], "ct" : <token> }}Request confirmation
{ "type" : "ok", "ok" : { "code" : "OK" }}Error responses
Invalid message format:
{ "type" : "error", "error": { "code" : "CLIENT_ERROR", "message" : "Invalid input" }}Invalid connection address:
{ "type" : "error", "error" : { "code" : "CLIENT_ERROR", "message" : "Invalid connection address" }}Unauthorized:
{ "type" : "error", "error" : { "code" : "CLIENT_ERROR", "message" : "Unauthorized" }}Invalid continue token:
{ "type" : "error", "error" : { "code" : "CLIENT_ERROR", "message" : "Invalid continue token:<token>" }}Sequence diagrams
Typical happy-path communication:
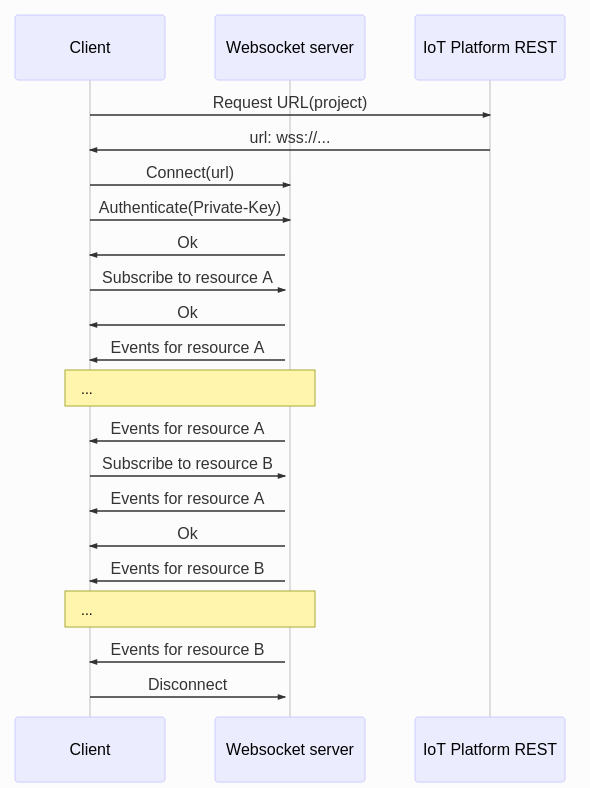
Connection termination for inactive user:
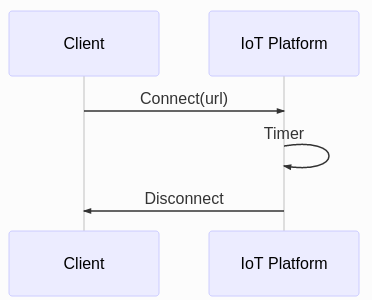
Troubleshooting/FAQ
If you are experiencing any issues with the Platform, e.g. your device is not sending data to the Platform correctly, this section may help you. Here you will find the answers to frequently asked questions and some procedures that may fix the issues you are experiencing.
One of my devices is not sending any data
If only one of your devices does not send data to the Platform, it probably has an incorrect configuration. To verify whether the device is properly connected, send a sample message of a freshly created property. To do so, perform the following steps:
-
On the IoT Platform, create a new property on the device. Make it a boolean property named "test".
-
Check the MQTT credentials of your device’s channel:
-
Find the channel to which your device is assigned. Each channel has the assigned devices' IDs listed in the field "Device ID".
-
Select the channel to see its properties.
-
Under "MQTT connectivity", you should see username and topic. Note them down.
-
-
Find the MQTT password to the channel.
-
If the device is not yours and you do not know the password, ask someone. Do not suddenly change the password unless this is the only option left.
-
If the device is yours and you don’t remember the password, you can change it by selecting the channel and clicking "Edit channel" → "I want to type new MQTT password".
-
-
Publish an MQTT message:
$ mosquitto_pub -u ${username} -P ${password} -h ${host} -t ${topic} -m '[{"n":"urn:dev:ca:ca:${project}:${device_id}:test", "vb": true}]'If the message has been successfully published (you see the test property value in device history), this means that the problem lies in the device (because a message sent from elsewhere is visible on the Platform).
If you don’t see the message:
-
Double-check if you entered the hostname, topic and password correctly;
-
Check whether the message is valid (e.g. all brackets and quotation marks are paired);
-
If the conditions above are met, this means the problem probably lies in the Platform and you should contact support.
Several devices are not sending any data
First, check whether the malfunctioning devices are connected to the same network. For example, are they connected by a Local Area Network? Or are all 5 malfunctioning beacons connected to one hub? If so, and if devices in other networks are working fine, the problem lies most probably in the network. If devices from many networks stopped working properly, the problem might be in the Platform itself and you should contact support.